When it comes to home decor, the ceiling often gets overlooked. You might think of drop ceilings as just a basic way to cover up unsightly pipes and wires. But this time around, I’ve been inspired to discover drop ceiling ideas that turn this feature into a stylish focal point. If you’re ready to elevate your space and add flair to your home, this post is for you. Whether you’re a DIY enthusiast or someone who’s simply passionate about home decor, you’ll find a treasure trove of vintage-inspired drop ceiling ideas that don’t just look stunning—they also tell a story. I’ve gathered 19 creative ceiling treatments that will transform your ordinary ceilings into extraordinary statements. From rustic wood beams to intricate molding, you’ll find options that can suit any style or budget. By the end of this guide, you’ll have plenty of inspiration to take your ceilings from basic to breathtaking. So let’s dive into these creative drop ceiling ideas that will add character and charm to your home!
Key Takeaways
– Discover a variety of drop ceiling ideas that can enhance your home decor, moving beyond basic styles to unique designs. – Explore vintage-inspired treatments like rustic wood beams, intricate molding, and vintage tin tiles that add warmth and personality. – Find practical DIY ceiling ideas that are easy to implement, allowing you to transform your space without professional help. – Learn about modern drop ceilings that incorporate ambient lighting designs and geometric patterns for a chic, contemporary look. – Get inspired by stylish ceiling options that include wallpapered ceilings and decorative fixtures to personalize your home’s atmosphere.Contents
- 1. Vintage Tin Tiles
- 2. Rustic Wood Beams
- 3. Painted Ceiling Panels
- 4. Fabric Draped Ceilings
- 5. Intricate Molding
- 6. Geometric Patterns
- 7. Embellished Ceiling Fixtures
- 8. Wallpapered Ceilings
- 9. Reclaimed Wood Ceiling
- 10. Stenciled Designs
- 11. Mirrored Ceiling Panels
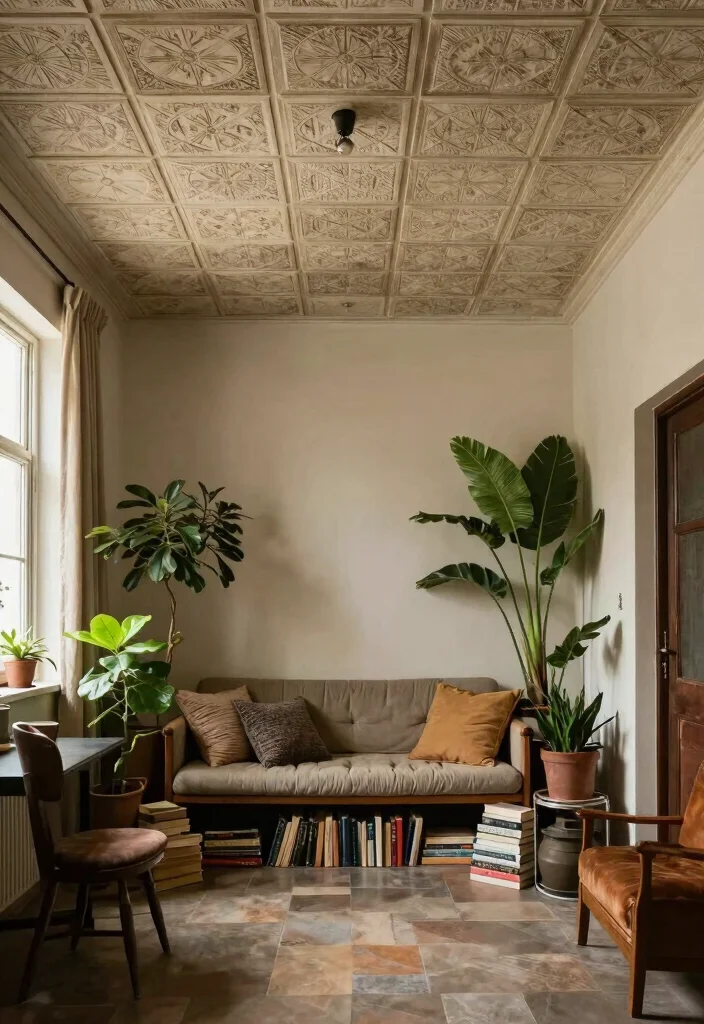
- 12. Textured Ceiling Tiles
- 13. Vintage Ceiling Medallions
- 14. Decorative Beadboard
- 15. Hanging Planters
- 16. Layered Ceiling Treatments
- 17. Ceiling Plant Shelves
- 18. Ambient Lighting Designs
- 19. Ceiling Art Displays
1. Vintage Tin Tiles
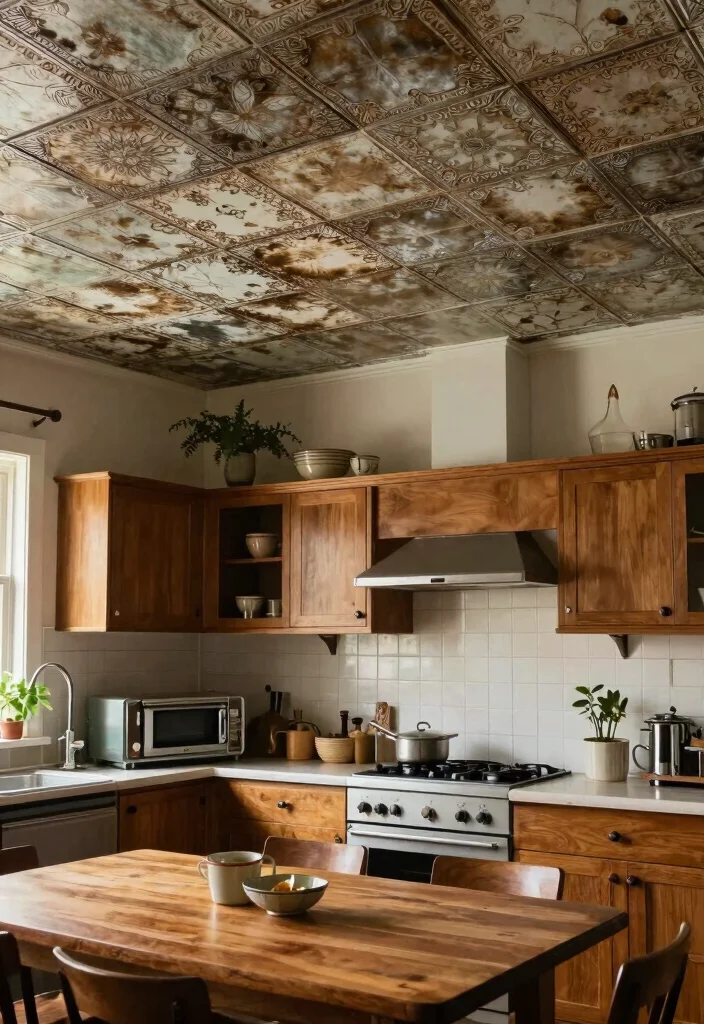
Vintage tin tiles can instantly uplift any room with their charming retro vibe. Their intricate patterns and reflective surfaces create visual interest and elegance overhead. Whether you choose a classic silver or opt for a pop of color, these tiles serve as a beautiful canvas for various decor styles, from rustic to modern chic.
To get started, measure your ceiling space to determine how many tiles you’ll need. Clean the surface thoroughly before applying adhesive or using a nail gun to secure the tiles. This method will leave you with a stunning ceiling that captures the essence of vintage elegance!
– Mix and match tile patterns for an eclectic aesthetic.
– Materials Needed: Vintage tin tiles, adhesive or nails, measuring tape, and a level.
– Benefits: Low maintenance and long-lasting beauty.
This delightful choice not only adds character but also serves as a captivating conversation starter!
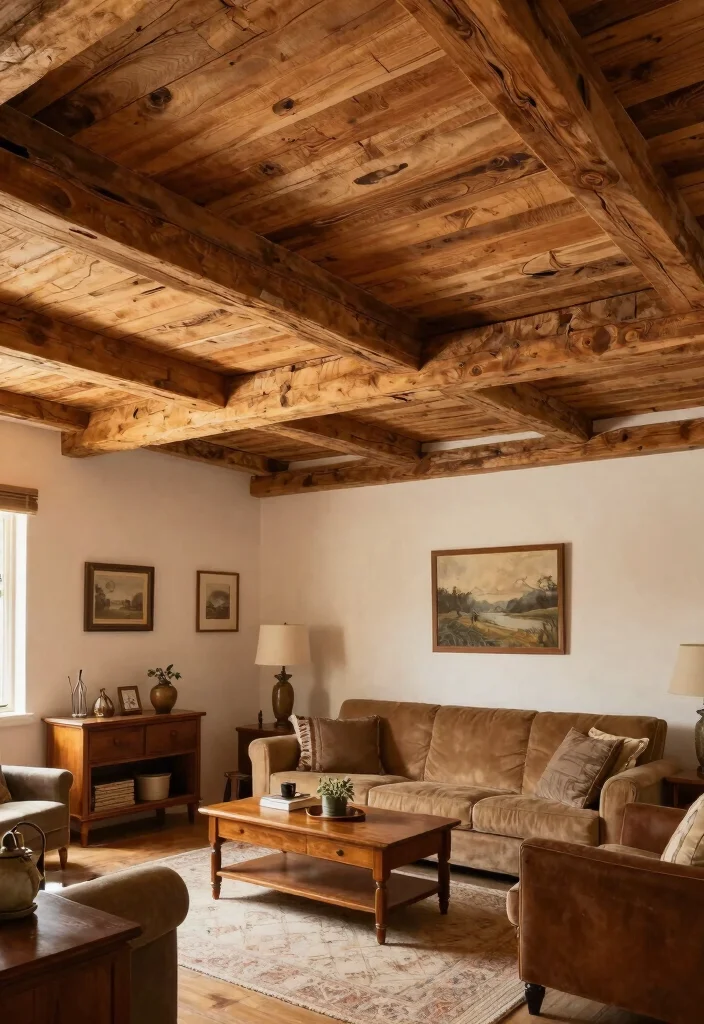
2. Rustic Wood Beams
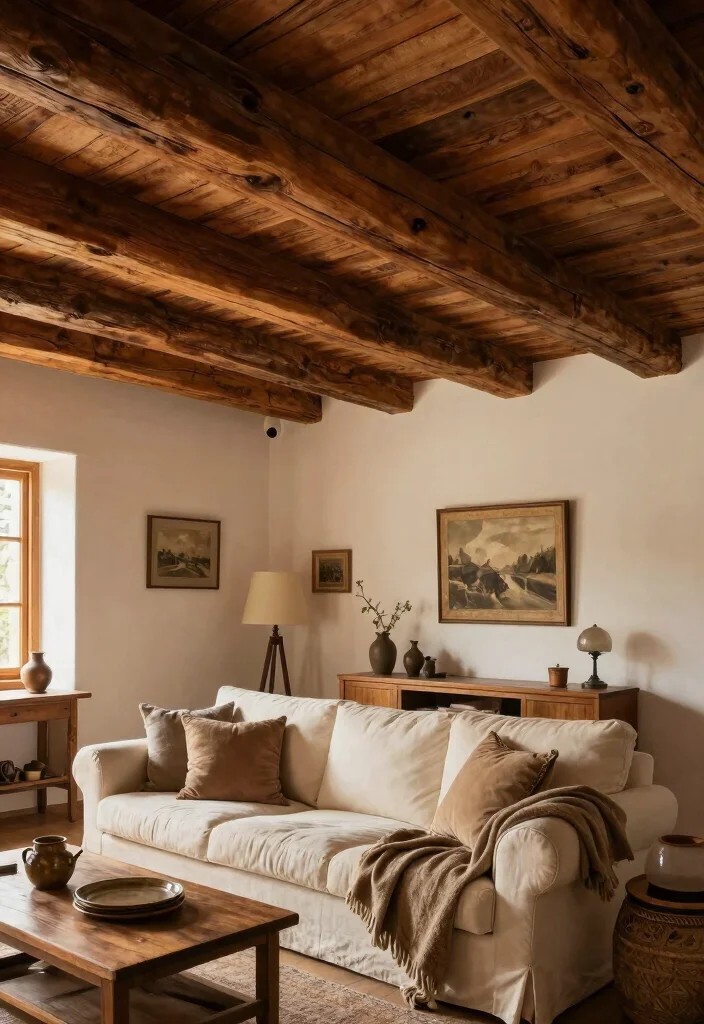
Introduce the warmth of rustic wood beams to create a cozy and inviting atmosphere in your home. These beams enhance architectural details while adding a natural touch that resonates with vintage decor. Choose between dark-stained wood for a dramatic flair or lighter tones for a more airy ambiance.
Start by selecting wood that matches your vision and measure carefully to cut each beam to the right length. Secure the beams to the ceiling joists with brackets or nails, and consider leaving them unfinished for that authentic rustic charm.
– Ensure your ceiling is strong enough to support the beams.
– Materials Needed: Wooden beams, brackets or nails, measuring tools.
– Pro Tip: Add smaller beams for increased texture and interest.
This design not only transforms your ceiling but also draws the eye upward, anchoring the entire room’s aesthetic!
📹 Related Video: DIY Distressed Faux Beams Ceiling Transformation
3. Painted Ceiling Panels
Bring life to your space with painted ceiling panels that express your style. Whether you prefer a bold color or a soft, muted tone, painting your drop ceiling panels can harmonize beautifully with your overall decor. Selecting shades that complement your furnishings creates a cohesive and inviting environment.
Choose a high-quality ceiling paint and prepare your panels by cleaning and lightly sanding them for better adhesion. Apply a primer first, followed by your chosen paint color, allowing time to dry between coats for the best result.
– Use lighter colors in small rooms to create an illusion of height.
– Materials Needed: Ceiling panels, primer, paint, brushes or rollers, painter’s tape.
– Advantages: Easily updateable for seasonal changes!
This technique not only adds character but also transforms the ceiling into a standout feature of your room.
4. Fabric Draped Ceilings
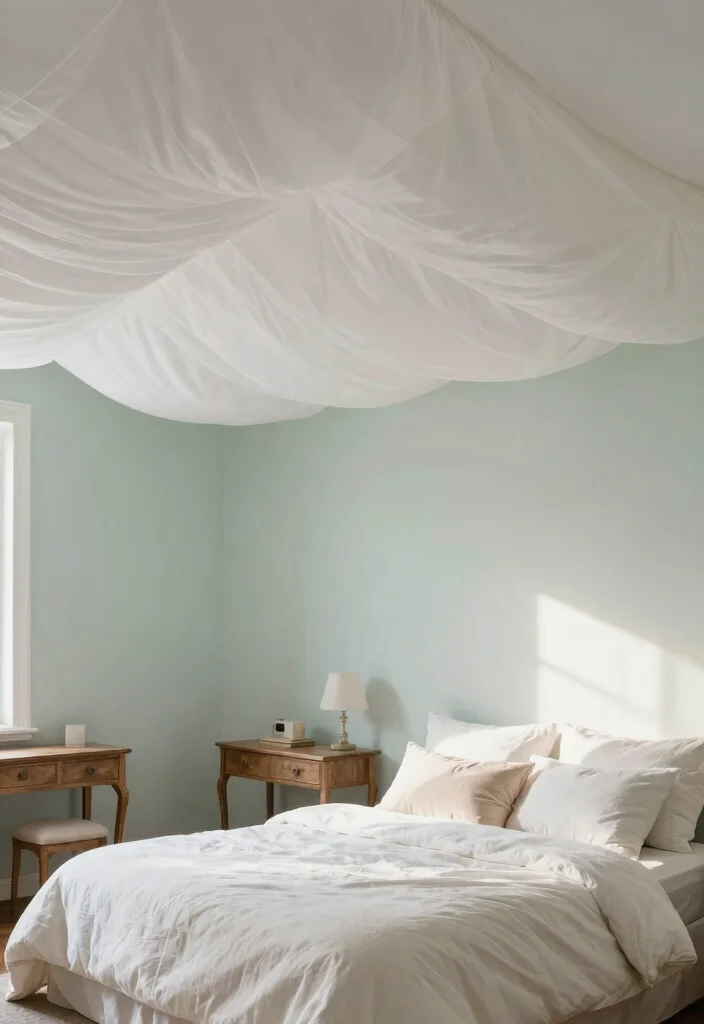
Create a dreamy atmosphere with a fabric draped ceiling, perfect for adding a touch of romance to any space. This approach introduces warmth and texture, making it an excellent choice for nurseries or cozy bedrooms. The flowing fabric creates a whimsical effect that envelops the room in softness.
Select lightweight materials like chiffon or tulle and install a sturdy rod or wire across your ceiling. Drape the fabric gently, allowing for variations in length and style to enhance the enchanting vibe.
– Use sheer fabrics to let soft light filter through.
– Materials Needed: Lightweight fabric, ceiling hooks or rods, measuring tape, and scissors.
– Advantages: Flexible and easily changed to suit your mood or seasons.
This beautiful treatment invites an elegant charm, turning even the simplest rooms into magical retreats.
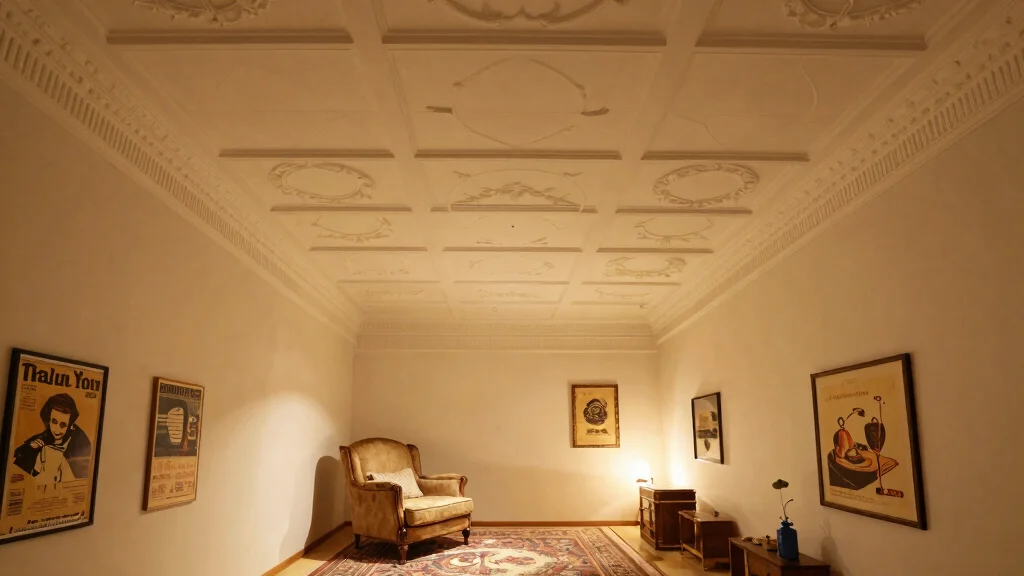
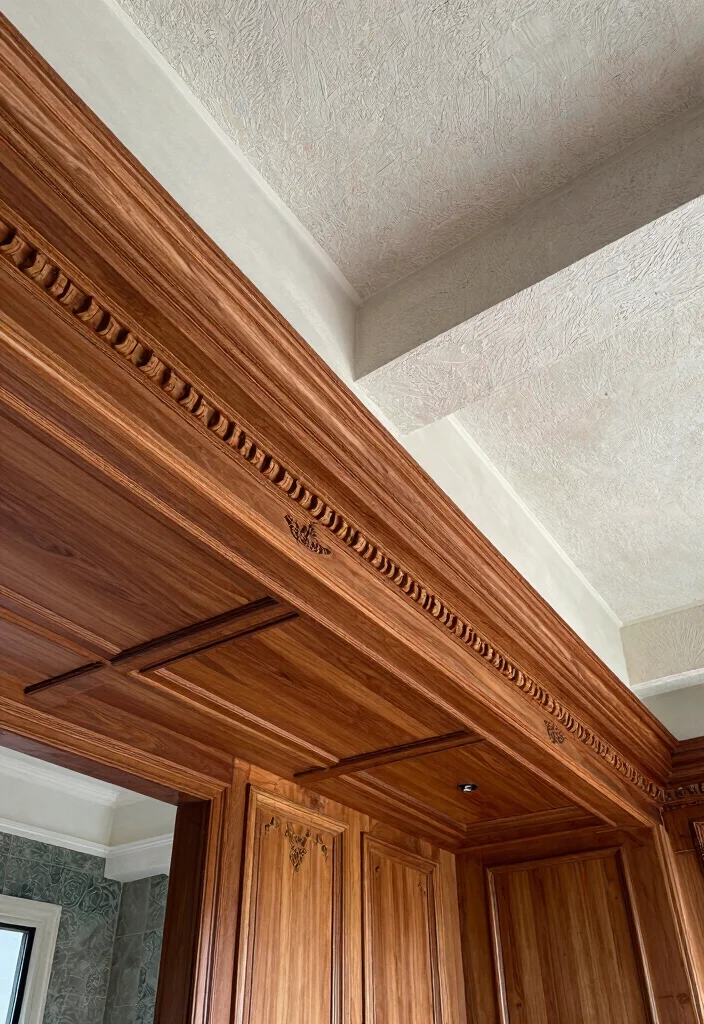
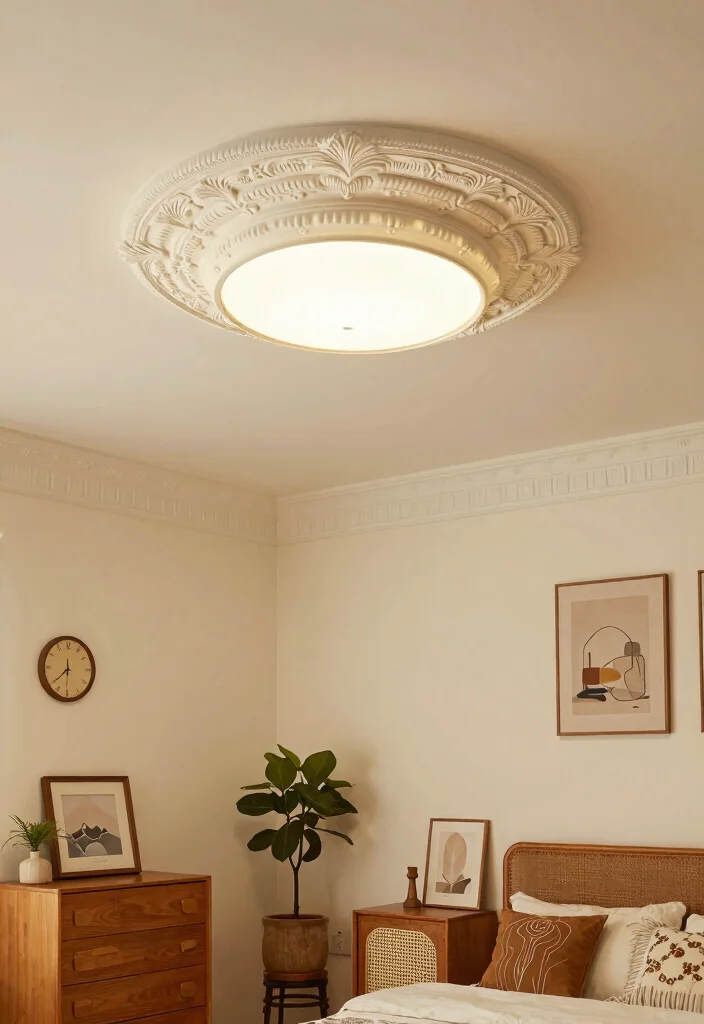
5. Intricate Molding
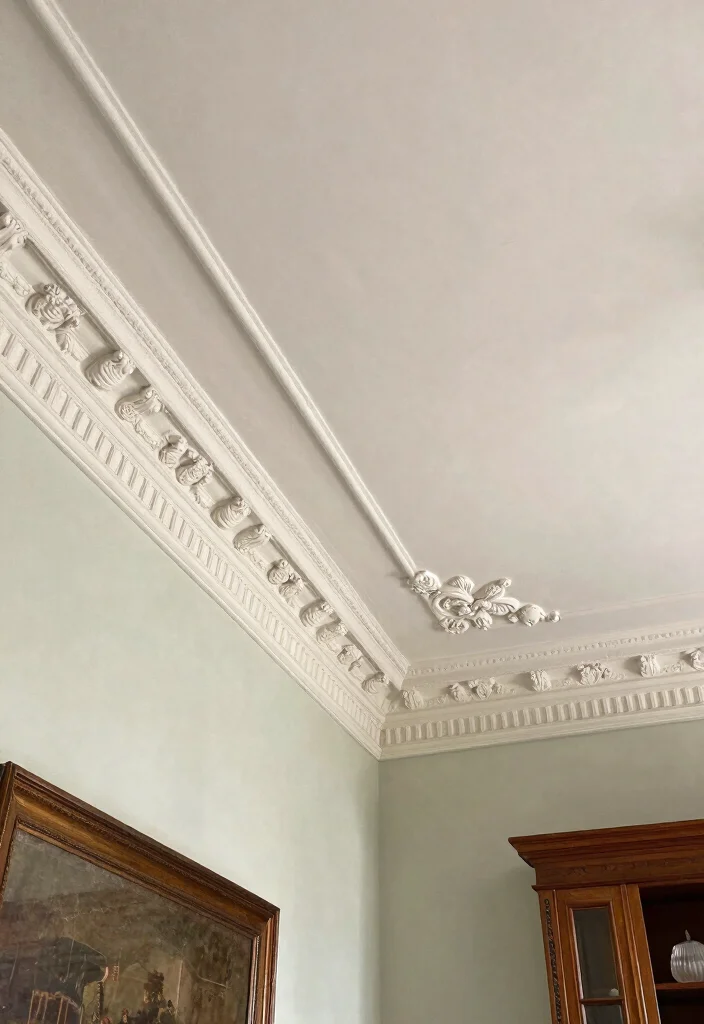
Enhance your ceiling with intricate molding, a sophisticated feature that infuses elegance into any room. Molding serves both decorative and functional roles, providing a stunning transition between walls and ceilings while adding depth and architectural interest.
Select a molding design that complements your vintage decor, choosing from ornate plaster or polyurethane options that can be painted to match or contrast with your ceiling. Secure the molding using construction adhesive or nails, ensuring crisp lines and tight corners.
– Mix different styles of molding for a unique aesthetic.
– Materials Needed: Molding strips, adhesive or nails, miter saw, and measuring tape.
– Benefits: Adds timeless architectural value to your home.
This elegant addition can dramatically alter your space, allowing you to embrace classic design elements that endure.
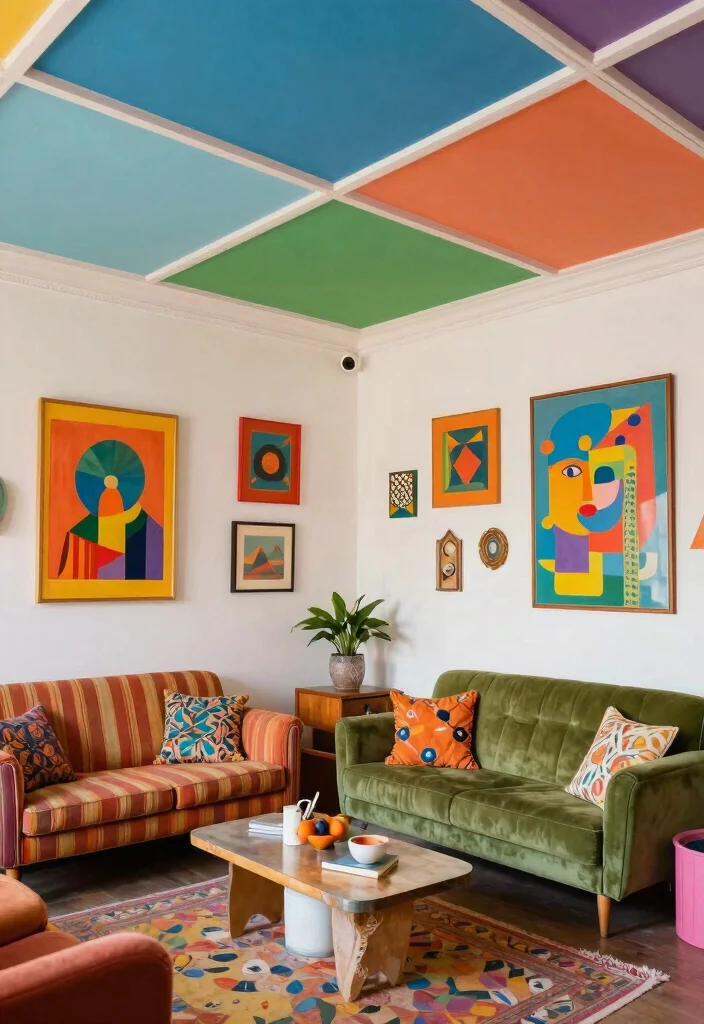
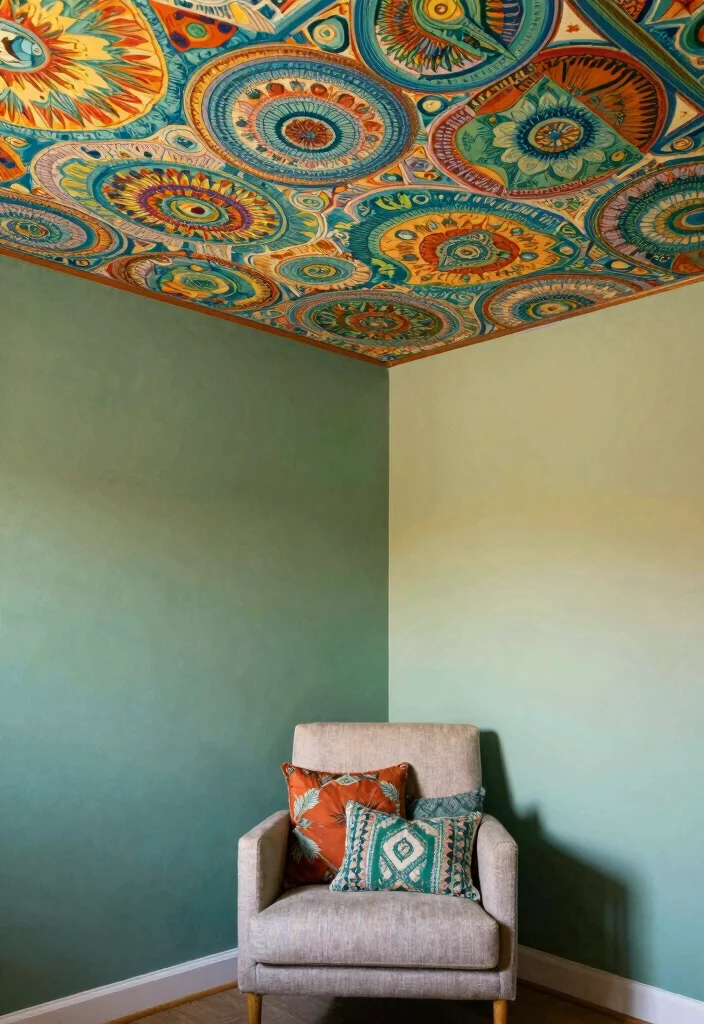
6. Geometric Patterns
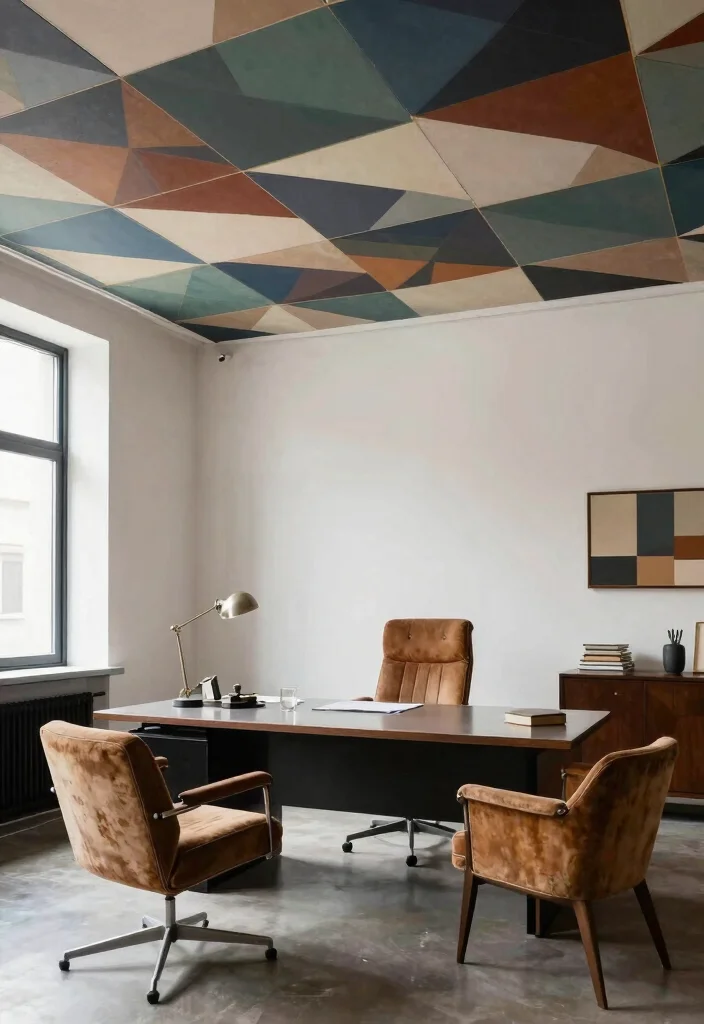
Introduce a modern flair to your vintage home with geometric patterns in your drop ceiling. Bold shapes and lines create a visually striking look that marries vintage charm with contemporary style, giving your space a fresh yet classic feel.
Opt for ceiling tiles or panels featuring geometric designs that coordinate with your color scheme. The installation process mirrors that of traditional tiles, but pay special attention to aligning patterns for a seamless finish.
– Use a monochromatic palette to make patterns stand out without overwhelming the space.
– Materials Needed: Geometric tiles, adhesive, cutting tools, and measuring tape.
– Pro Tip: Let the patterns influence your room’s color palette.
This design captivates attention, transforming any ceiling into a remarkable focal point.
How To Choose Vintage-Inspired Drop Ceiling Ideas
Choosing the right vintage-inspired drop ceiling can elevate your space and add character. Here are key factors to consider when selecting drop ceiling ideas that look anything but basic. 1. Style and ThemeThink about the overall style of your space. Are you going for a rustic look, or do you prefer something more ornate? Vintage-inspired designs can range from classic tin tiles to reclaimed wood beams. Make sure the ceiling complements the existing decor, creating a cohesive look throughout your room.
2. Material
The choice of material can significantly impact the ceiling’s appearance and durability. Tin tiles bring a timeless elegance, while wood offers a warm, rustic charm. Fabric-draped ceilings add softness to modern spaces. Consider how each material interacts with light and how well it matches your style preferences.
3. Size and Scale
Measure your space carefully. Pay attention to the height of your ceiling and the dimensions of the room. Large, ornate designs can overwhelm a small room, while minimalist patterns might get lost in a vast space. Aim for balance; a rule of thumb is to choose a ceiling design that takes up about 30-50% of the room’s height.
4. Budget
Vintage ceilings can vary widely in cost. Determine how much you are willing to spend and stick to it. Tin tiles and intricate moldings can be pricier, while DIY options like painted panels or stenciled designs can stretch your budget further. Remember to factor in installation costs if you’re not planning to do it yourself.
5. Maintenance
Consider how much upkeep you are willing to commit to. Some materials, like wood, may require regular sealing or staining to maintain their beauty. On the other hand, metal tiles can be less demanding but may require periodic polishing. Understanding maintenance needs will help you choose a ceiling that fits your lifestyle.
6. Installation Method
Think about whether you’ll tackle the installation yourself or hire a professional. Some vintage ceiling options, like suspended ceiling designs, can be more complex to install. If you are a DIY enthusiast, explore simpler ideas like fabric-draped ceilings or wallpapered options that can be done quickly and easily.
Pro Tip: Before making a final decision, consider creating a mood board. Collect materials, colors, and design inspirations that reflect your vision. This visual aid can help you see how different elements will work together, ensuring your vintage-inspired drop ceiling is a perfect fit for your home.
7. Embellished Ceiling Fixtures
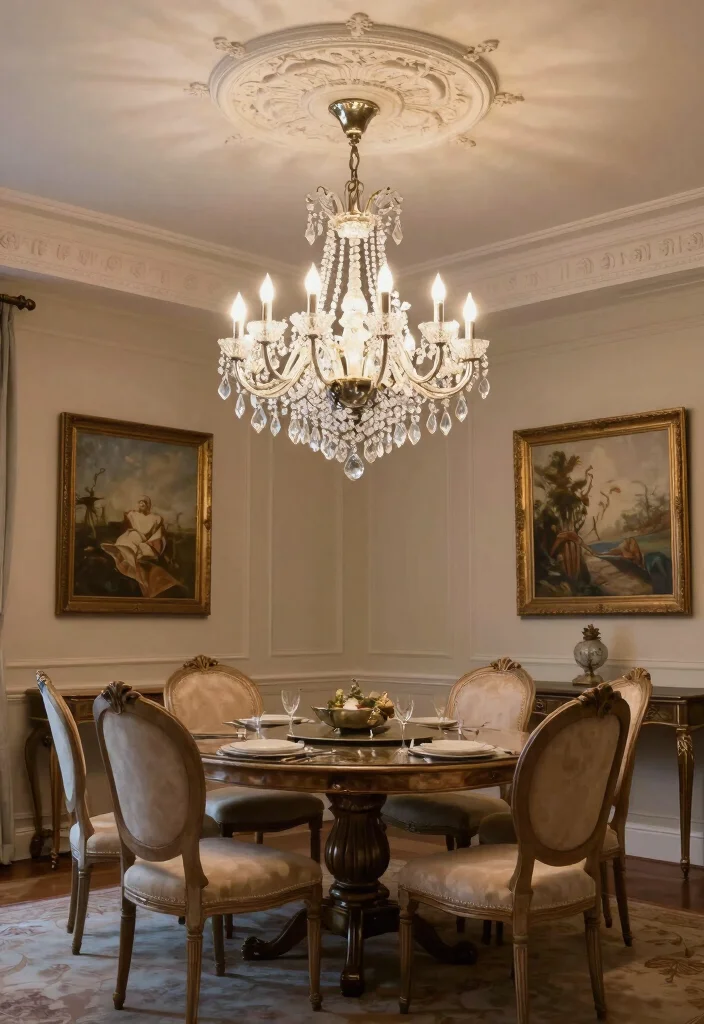
Add a touch of glamour with embellished ceiling fixtures. An ornate chandelier or a vintage pendant lamp can become the centerpiece of your drop ceiling, enhancing both style and functionality. Selecting an exquisite fixture can elevate the room’s aesthetic and draw the eye upwards.
When choosing a fixture, consider the size of the room and the height of your ceiling. Opt for vintage-inspired pieces like a crystal chandelier or wrought iron designs. Follow proper installation guidelines to ensure everything is securely in place.
– Pair your fixture with dimmer switches for adjustable lighting ambiance.
– Materials Needed: Chandelier or fixture, mounting hardware, electrical tools.
– Advantages: Creates a high-impact look without extensive renovations.
These fixtures not only illuminate your space but also enhance its character and charm.
8. Wallpapered Ceilings
For an unexpected twist, consider wallpapering your ceiling. This unique treatment can add texture, color, and personality to your drop ceiling, making it an artistic element in any room. Whether you choose vintage patterns or bold prints, the ceiling transforms into a creative canvas.
Select wallpaper that is durable and suitable for ceilings. Prepare the surface carefully, ensuring it is clean and dry before applying adhesive. Align the patterns meticulously and press firmly to eliminate air bubbles for a smooth finish.
– Use lighter colors in small spaces to enhance openness.
– Materials Needed: Wallpaper, adhesive, smoothing tool, and utility knife.
– Benefits: Unique ceiling treatment that can be easily updated.
This imaginative idea adds a playful twist to traditional decor, allowing ceilings to become true works of art.
9. Reclaimed Wood Ceiling
Consider a reclaimed wood ceiling for a sustainable and rustic aesthetic. Incorporating salvaged wood adds history and character to your home while being environmentally conscious. The natural variations in wood create a charming rustic appeal that pairs beautifully with vintage decor.
Source reclaimed wood from local suppliers or salvage yards, then measure and cut the pieces to fit your ceiling. Secure the planks with nails or adhesive, ensuring they are evenly spaced for a polished look.
– Choose wood with distinct textures or colors for added interest.
– Materials Needed: Reclaimed wood planks, nails or adhesive, measuring tools, and a saw.
– Advantages: Eco-friendly choice that tells a story.
This design not only looks stunning but also supports sustainable living practices.
Fun fact: a reclaimed wood ceiling uses up to 80% less new lumber than new builds, aligning with vintage-inspired drop ceiling ideas. Salvaged planks age gracefully, reduce waste, and add warmth DIYers can secure with nails or adhesive.
10. Stenciled Designs
Stenciled designs add a personal touch to your drop ceiling while allowing for creative expression. This DIY option is perfect for those who enjoy customizing their spaces. Choose from a variety of stencil patterns to elevate a simple ceiling into a standout feature.
Select a stencil design that complements your overall decor. Prepare the ceiling by cleaning it thoroughly, then use painter’s tape to secure the stencil in place. Apply your chosen paint color carefully, removing the stencil to reveal your artistic creation.
– Use contrasting colors for a bold visual impact.
– Materials Needed: Stencils, paint, painter’s tape, and a foam roller or brush.
– Benefits: Customizable to your tastes and easy to change.
This technique ensures your ceiling isn’t just functional but also a unique piece of art.
11. Mirrored Ceiling Panels
For a dramatic statement, consider mirrored ceiling panels. This striking design reflects light and creates the illusion of a larger space, making it ideal for smaller rooms that need a bright touch. Mirrored panels can add a glamorous flair to your vintage-inspired decor.
When installing mirrored panels, ensure your ceiling is smooth and prepped. Use mirror adhesive to secure the panels, aligning them correctly for a flawless look. Adding LED strip lights around the edges enhances the glow and charm.
– Employ mirrors sparingly to avoid overwhelming the space.
– Materials Needed: Mirrored panels, adhesive, measuring tape, and safety gear.
– Advantages: Amplifies light and creates an illusion of spaciousness.
This eye-catching option can transform a room into a luxurious retreat!
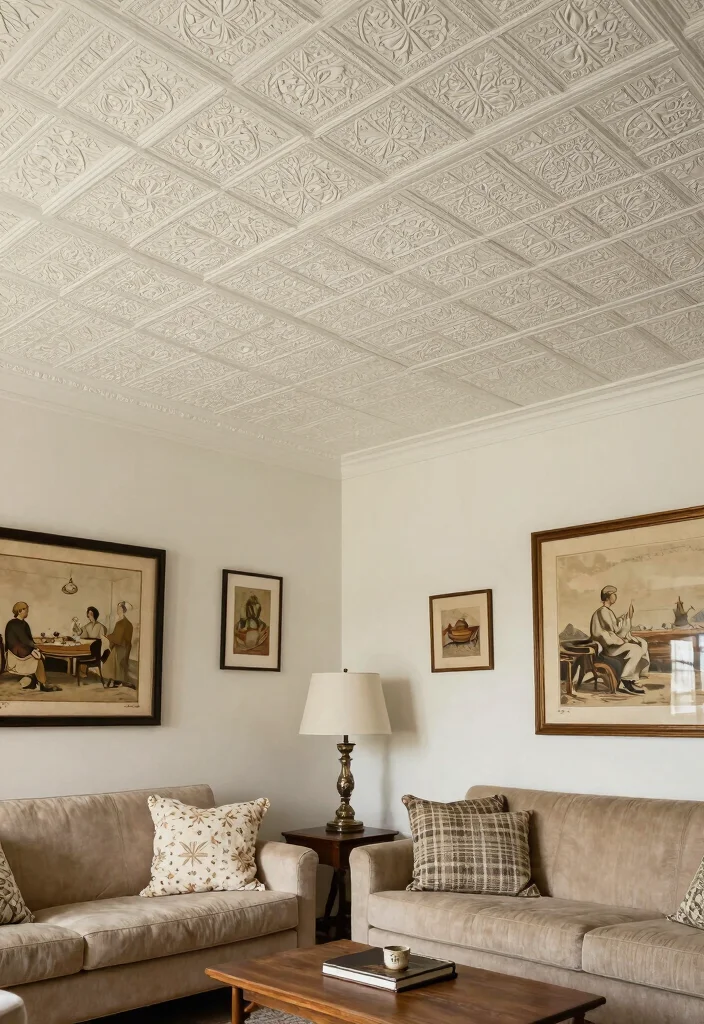
12. Textured Ceiling Tiles
If you’re after a simple yet impactful upgrade, consider textured ceiling tiles. These tiles mimic natural materials like wood or stone, adding dimension and depth to your ceiling. Their variety of designs allows you to find the perfect match for your decor style.
Ensure your ceiling surface is clean and flat before installation. Apply adhesive to mount the tiles, following the manufacturer’s instructions for best results. Choose a color that complements your other decor or paint them for a custom touch.
– Mix various textures for an eclectic vibe.
– Materials Needed: Textured tiles, adhesive, and a measuring tool.
– Benefits: Low maintenance and easy to install.
This option allows you to introduce diverse patterns and materials without major renovations!
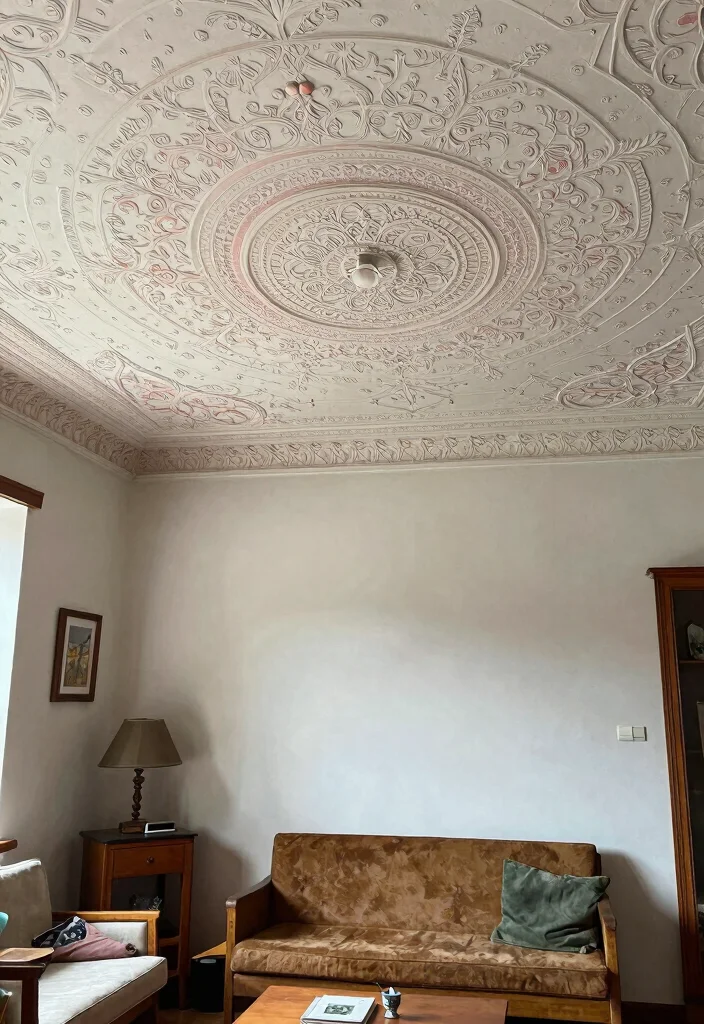
13. Vintage Ceiling Medallions
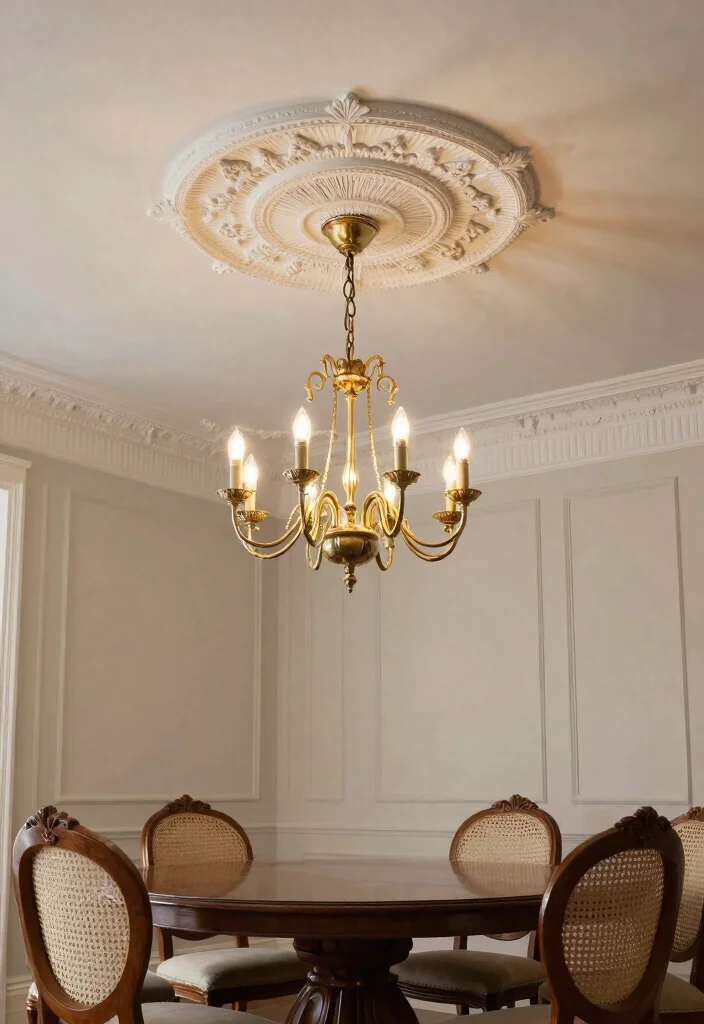
Incorporate vintage ceiling medallions to bring old-world charm to your design. These architectural details add sophistication and character to any ceiling, functioning beautifully as a focal point around light fixtures or as standalone decor pieces.
To install, choose a medallion that fits your style and paint it to coordinate with your ceiling or create a striking contrast. Secure the medallion using adhesive or nails, ensuring it is centered and properly aligned.
– Layer multiple medallions for a more dramatic effect.
– Materials Needed: Ceiling medallions, adhesive or nails, and paint.
– Advantages: A simple and elegant enhancement without much effort.
This timeless element can make any room feel grand and inviting!
Fun fact: Vintage ceiling medallions have graced grand rooms for centuries. When you pair them with drop ceiling ideas, you can elevate light fixtures as focal points and boost perceived height by up to 12%.
14. Decorative Beadboard
Decorative beadboard offers a classic appeal that beautifully suits drop ceilings. The vertical lines create visual interest and can make a room feel taller and more spacious, making it a favored choice for vintage-inspired homes.
To install, secure beadboard panels to the ceiling using adhesive or nails. Paint them to match your decor for a seamless look, providing a lovely backdrop for light fixtures or other ceiling accents.
– Opt for a high-gloss finish for added shine.
– Materials Needed: Beadboard panels, adhesive or nails, and paint for finishing.
– Benefits: Durable and character-enhancing for any space.
This treatment brings refined elegance that elevates the overall look of your home!
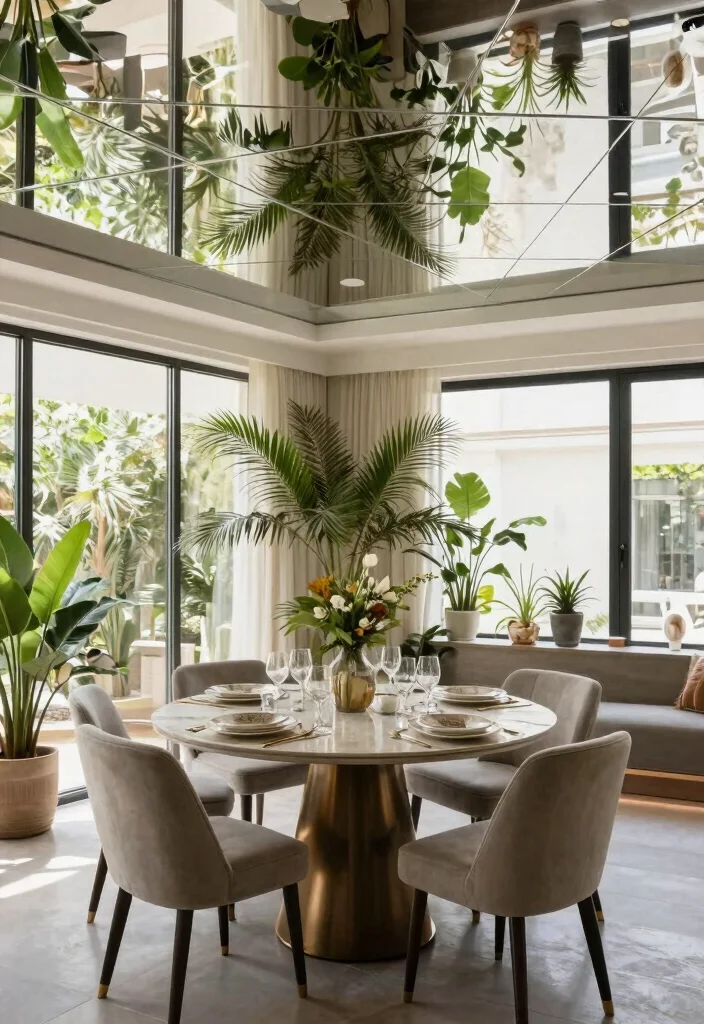
15. Hanging Planters
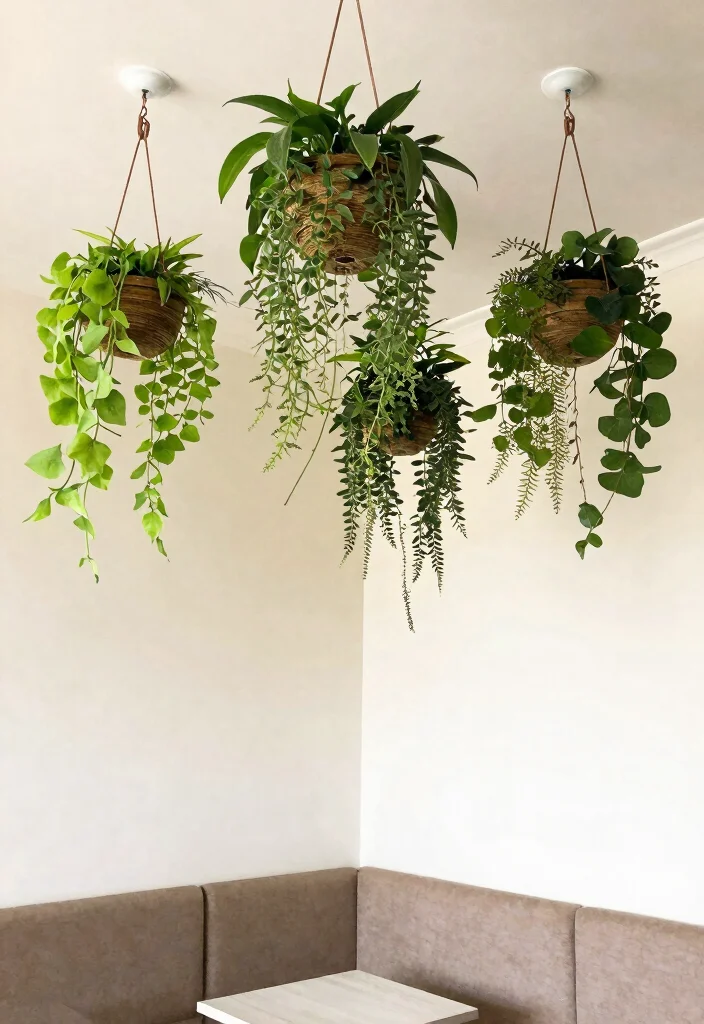
Hanging planters provide a vibrant way to decorate your drop ceiling while incorporating greenery into your decor. This design adds visual interest and a fresh feel, making your space more inviting. Hanging plants can create a lively atmosphere and enhance indoor air quality.
Select a variety of planters and plants that suit your style. Secure hooks firmly into the ceiling to support the weight of the plants. Arrange the planters at varying heights for a dynamic look that draws the eye.
– Use trailing plants for added drama and depth.
– Materials Needed: Hooks, planters, plants, and measuring tools.
– Benefits: Introduces nature indoors and purifies the air.
This lively touch enhances the aesthetic of any room while promoting a healthy home environment!
Fun fact: Adding hanging planters can boost perceived ceiling height by up to 15% and add instant color to your space. Rotate plants seasonally to keep the vibe fresh, and hang at varying heights for dynamic, Instagram-worthy drop ceiling ideas.
16. Layered Ceiling Treatments
For a stunning visual impact, consider layered ceiling treatments. Combining various materials and textures creates a captivating look that draws attention upward. This approach is ideal for those who appreciate a mix of styles and creativity.
Start by selecting a base treatment, such as painted tiles or wood panels. Layer additional elements like stencils or decorative moldings to add depth. Ensure everything is secured properly for a cohesive appearance.
– Balance bold layers with softer elements for visual harmony.
– Materials Needed: Base treatment materials, additional decorative elements, adhesive or nails.
– Benefits: Highly customizable and unique to your personal space.
This option allows for maximum creativity, turning your ceiling into a gallery of style.
17. Ceiling Plant Shelves
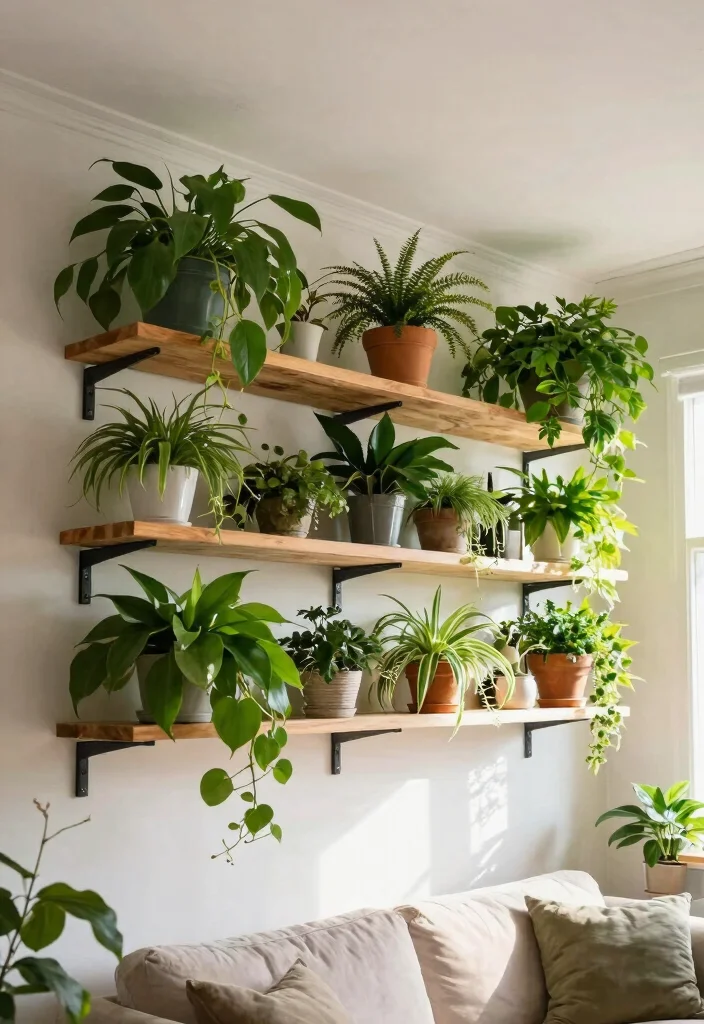
Ceiling plant shelves offer a distinctive way to showcase your favorite plants while enhancing your drop ceiling. This innovative design not only brings greenery into your home but also optimizes vertical space, creating a fresh and inviting atmosphere.
Select shelving that complements your ceiling design and secure the shelves to the ceiling joists with brackets for stability. Choose a variety of plants that thrive in your home’s lighting conditions and arrange them artfully for visual appeal.
– Use trailing plants to create a cascading effect for added drama.
– Materials Needed: Shelving units, brackets, and plants.
– Benefits: Adds unique decor while improving indoor air quality.
This creative idea transforms your ceiling into a living art piece that showcases your love for nature.
18. Ambient Lighting Designs
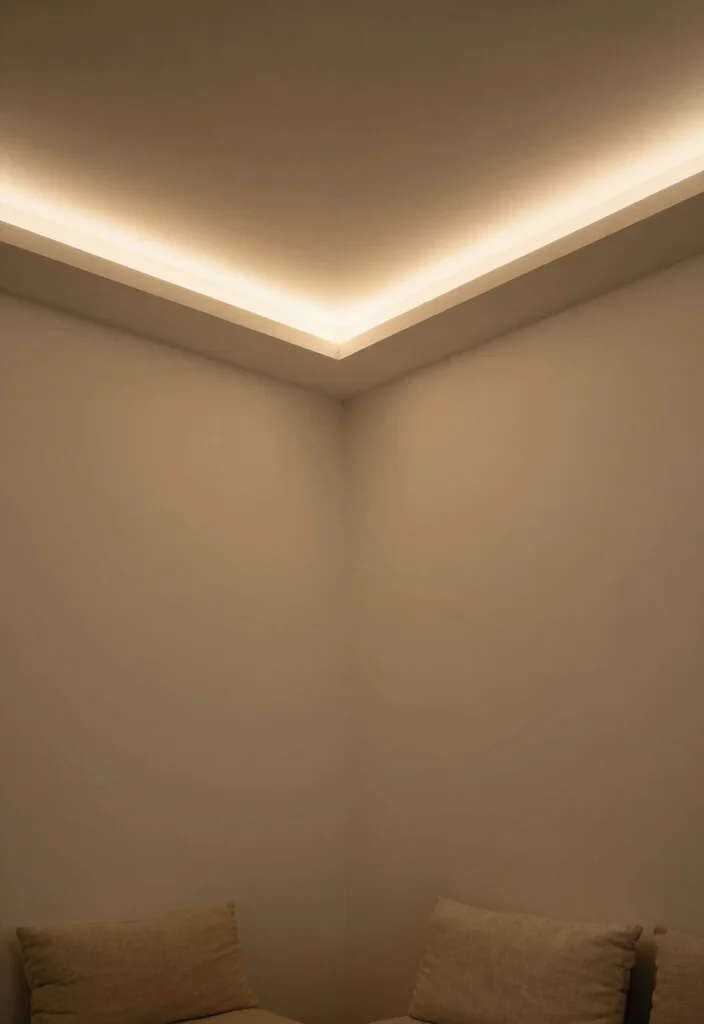
Incorporate ambient lighting designs into your drop ceiling for a warm and inviting glow. This approach enhances the aesthetic while creating a cozy mood in any room. Utilize LED strip lights or recessed lighting to add warmth and dimension to your space.
Before installation, plan your lighting layout considering areas that need more illumination. Place lights along the ceiling edges or within crown molding for a subtle yet effective glow. This creates a floating effect that enhances your ceiling’s design.
– Use dimmable lights for adjustable ambiance to suit different moods.
– Materials Needed: LED strips or recessed lights, wiring, and installation tools.
– Benefits: Adds warmth and enhances the overall decor of your home.
This lighting strategy can dramatically change the feel of a space, elevating it from ordinary to extraordinary.
19. Ceiling Art Displays
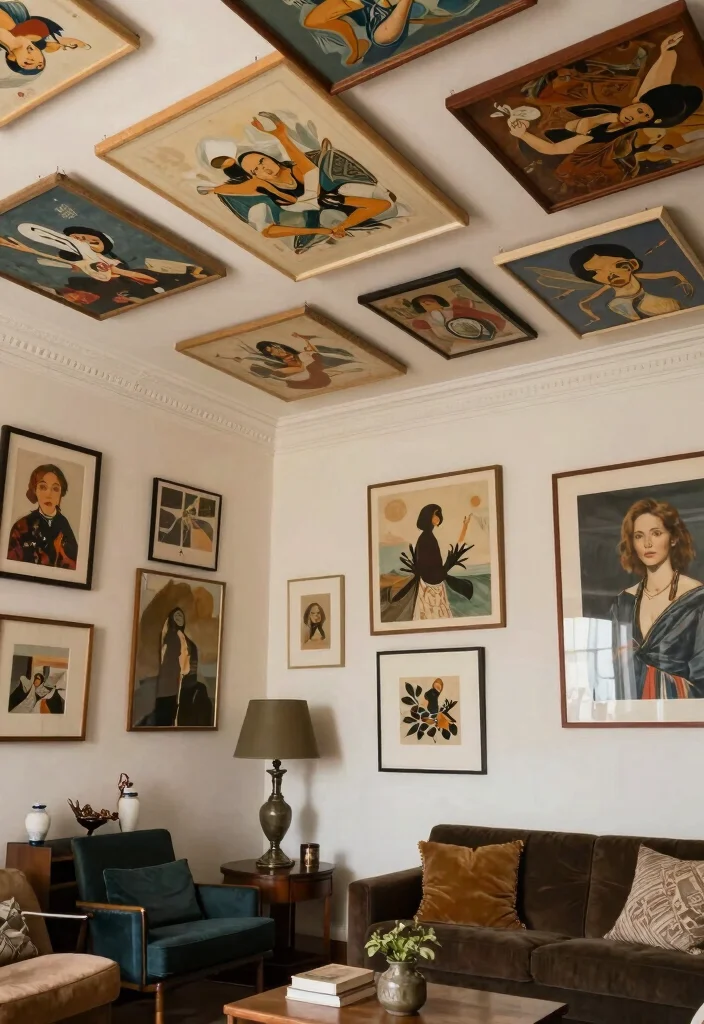
Transform your drop ceiling into an artistic canvas with ceiling art displays. This unique concept allows you to showcase artwork or decorative pieces that draw attention upward, making your ceiling a key design feature.
Select lightweight art pieces or framed prints that resonate with your decor theme. Secure them using adhesive or brackets, ensuring they are spaced evenly for visual balance. This innovative approach gives your ceiling a gallery-like feel, celebrating your personal style and interests.
– Choose a cohesive color palette for a unified and polished look.
– Materials Needed: Art pieces, adhesive or brackets, and measuring tools.
– Benefits: Personalizes your space and adds intriguing visual interest.
This treatment not only makes a bold statement but transforms the ordinary into the extraordinary!
Conclusion
The world of drop ceilings is filled with creativity and potential, especially with vintage-inspired ideas that bring charm and elegance to any room. Incorporating these ideas can transform ordinary ceilings into extraordinary design features, allowing your home to reflect your personality and style. Don’t hesitate to experiment and find the perfect balance that resonates with you.
Frequently Asked Questions
What are some vintage-inspired drop ceiling ideas that look anything but basic?
Think tin tile patterns, beadboard, or perforated metal to give you that vintage vibe while staying modern. Start with standard 12×12 or 24×24 tiles in a metallic, wood-grain, or whitewashed finish and pair them with warm LED lighting to keep the space bright. Mix textures across the grid to create a suspended ceiling designs look that feels intentional and stylish. For a DIY twist, paint a few tiles, stencil a motif, or add wood slat accents to selected panels for a creative ceiling treatments look.
How can I implement creative ceiling treatments on a suspended ceiling design without a full remodel?
With a suspended ceiling designs layout, you can transform the look without heavy renovations. Try adding wood slats over select grid sections, inserting lattice panels, or applying removable wallpaper or fabric to ceiling tiles. Use adjustable LED strips along the grid edges or recessed lighting to highlight the texture. These DIY ceiling ideas let you experiment and swap back later if needed.
What are affordable DIY drop ceiling ideas for a stylish ceiling option?
Yes, you can achieve a chic look on a budget. Paint or stencil metal tiles, install beadboard or pegboard panels on selected sections, or wrap tiles with removable wallpaper for instant texture. Add warm wood veneer slats to create a cozy, vintage-inspired feel. Illuminate with dimmable LEDs or cove lighting to maximize impact. These DIY ceiling ideas are practical and reversible, perfect for renters.
Are there modern drop ceilings that still feel vintage or retro?
Absolutely. Blend modern materials and lighting with retro patterns to get the best of both worlds. Think matte black or brass trim on a modern drop ceilings with tin or lattice inserts, or a pale pastel palette on beadboard panels. Use energy-efficient LEDs, slim profiles, and minimal hardware to keep the space feeling current while nodding to vintage charm. This is all about balancing creative ceiling treatments with suspended ceiling designs.
How do I choose materials and lighting to maximize a drop ceiling’s impact?
Start by considering room height and acoustics—dense tiles can soften sound in open spaces. Choose tile finishes and colors that harmonize with your decor; metallics for glam, wood tones for warmth, or bright white for brightness. Plan lighting first: use dimmable LEDs, LED strips along the grid, and consider spot lighting on artwork. Finally, map the grid so you can add or remove elements later; this stylish ceiling options approach ensures a balanced, practical result.