Are your ceilings feeling a bit too plain? You’re not alone in wanting to spruce things up a bit! As I’ve been wandering through homes and flipping through decor magazines, I’ve noticed a trend that truly captivates me: painted ceilings. This post is designed to inspire you with 18 painted ceiling ideas that make a statement, turning a mundane overhead into a masterpiece.
If you’re someone who craves unique interior designs that stand out, this post is just for you. Maybe you’re looking to add a touch of vintage charm or an eclectic twist to your space. Regardless of your style, there’s something here that will ignite your creativity and transform your rooms in delightful ways.
From vintage floral patterns to bold abstract designs, you’ll find an array of painted ceiling ideas that are bold, creative, and perfect for making a lasting impression. Each idea is tailored to provide you with ceiling paint inspiration that can dramatically change the feel of your home. Get ready to explore the colorful world above your head, and let’s dive into these unique painted ceiling ideas!
Key Takeaways
– Explore various styles: Discover different painted ceiling ideas, including vintage floral patterns and bold abstract designs, to find what resonates with your personal style. – Inspiration for every room: Each suggestion offers a unique twist that can energize spaces like living rooms, bedrooms, or even kitchens, making your home feel more inviting. – Practical tips for implementation: Learn how to apply these ideas with practical insights on color choices, techniques, and finishes that suit your decor needs. – Mix and match ideas: Combine elements from different themes to create your own unique ceiling treatments that reflect your personality and style. – Embrace creativity and individuality: Painted ceilings are an opportunity to express yourself and transform your home into a true reflection of who you are.Contents
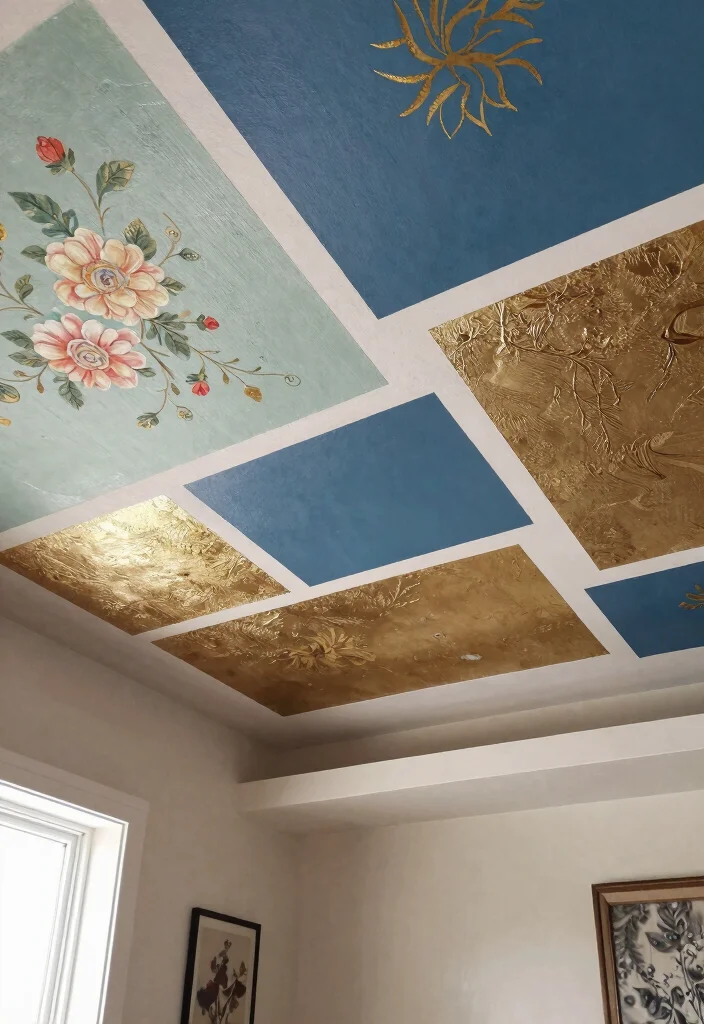
- 1. Vintage Floral Patterns
- 2. Geometric Shapes
- 3. Ombre Effects
- 4. Striking Monochrome
- 5. Artistic Murals
- 6. Textured Ceilings
- 7. Celestial Themes
- 8. Bright and Playful Colors
- 9. Rustic Wood Finishes
- 10. Artistic Stencils
- 11. Two-Tone Ceilings
- 12. Whimsical Patterns
- 13. Layered Textures
- 14. Festive Themes
- 15. Chic Metallics
- 16. Bold Abstract Designs
- 17. Nature-Inspired Designs
- 18. Minimalist White Ceilings with Bold Accents
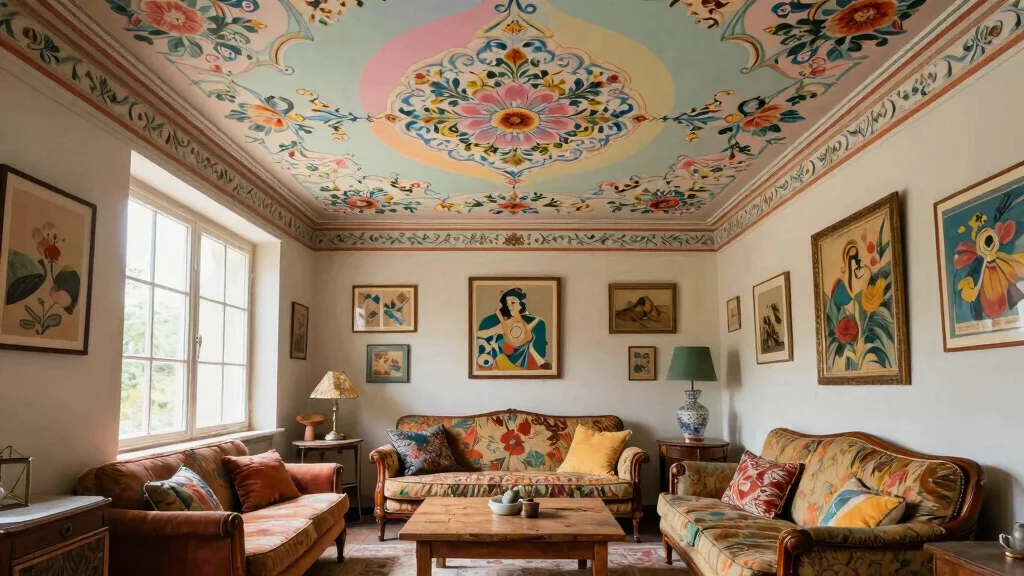
1. Vintage Floral Patterns
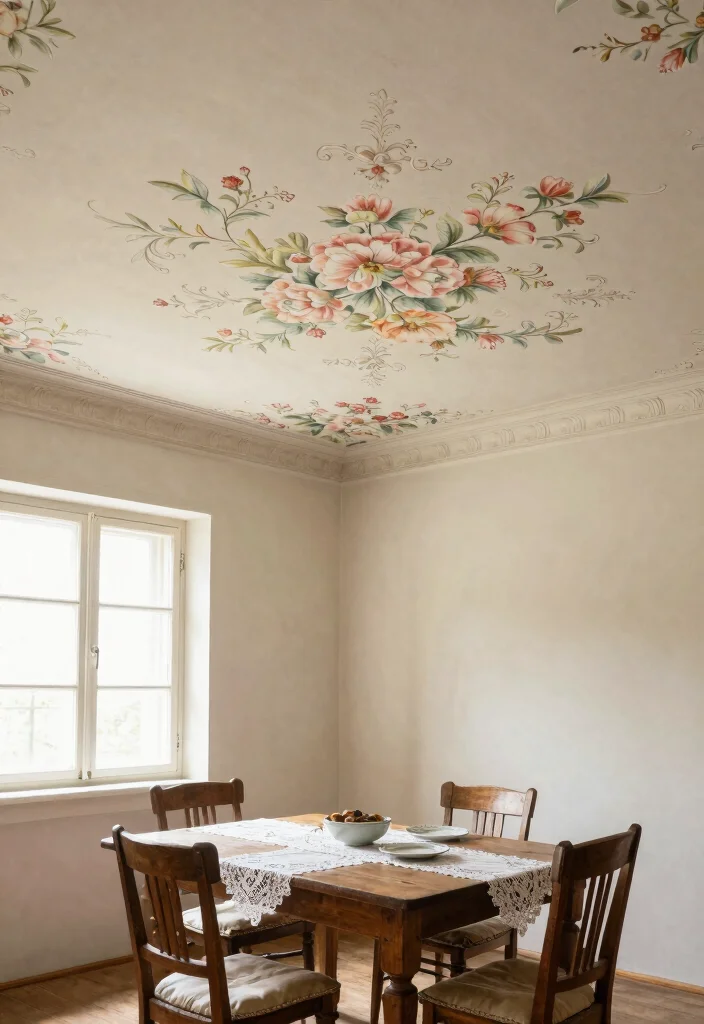
Embrace nostalgia with painted ceilings that feature vintage floral patterns. This charming style brings a delightful touch of the past to your home, filling the space with whimsy and warmth. Imagine a soft cream ceiling adorned with delicate, hand-painted flowers in muted shades of lavender and rose, creating a serene and inviting atmosphere.
These ceilings shine in bedrooms, dining areas, and cozy corners, making each space feel like an enchanting retreat. Pair this design with vintage-inspired furnishings, such as an ornate wooden table or a plush velvet chair, to amplify the overall effect.
Tips for achieving this look:
– Select colors that complement your existing decor.
– Use stencils for intricate designs if freehand painting feels challenging.
– Finish with a matte sealant for that charming vintage aesthetic.
This style thrives in spaces filled with natural light, allowing the colors to vibrantly come alive! It’s also a fantastic conversation starter when entertaining guests.
Step-by-step instructions:
1. Choose your color palette and floral design.
2. Prepare the ceiling surface, ensuring it is clean and smooth.
3. Start painting with a stencil from one corner and work across.
4. Allow the paint to dry completely before applying a protective finish.
Pro Tip: Start with a soft cream ceiling and test muted lavender and rose tones on a small area. A vintage floral pattern can transform bedrooms and dining areas into a warm, inviting retreat—perfect for easy, scalable painted ceiling ideas.
2. Geometric Shapes

For those seeking a modern edge, geometric shapes offer a striking ceiling treatment that can transform your space. Bold triangles, hexagons, and swirling curves in rich jewel tones or sharp contrasts can create a dynamic and refreshing atmosphere. Picture a bright blue ceiling highlighted with crisp white shapes, generating a sense of movement and vibrancy.
This style is perfect for contemporary homes, easily adapting to various rooms. In a home office, a geometric ceiling can stimulate creativity, while in a living room, it serves as a captivating focal point.
Tips for achieving this look:
– Choose a primary ceiling color paired with a contrasting color for the shapes.
– Use painter’s tape to outline clean lines for a professional finish.
– Experiment with different shapes and sizes until it feels just right.
This design particularly shines in open-concept spaces, drawing the eye upward while enhancing the overall flow of the area.
Step-by-step instructions:
1. Decide on your color scheme and layout.
2. Outline your geometric shapes on the ceiling with painter’s tape.
3. Paint the entire ceiling with your chosen primary color.
4. Once dry, fill in the shapes with the contrasting color and carefully remove the tape.
3. Ombre Effects
Ombre ceilings create a breathtaking visual gradient from one color to another, producing a soothing and ethereal effect. Gradually blending from dark shades at the edges to lighter hues in the center can give the illusion of higher ceilings, enhancing the spaciousness of your room. Picture a soft lavender transitioning into a gentle white, offering a calming backdrop perfect for bedrooms or meditation areas.
This technique is especially effective in spaces designed for tranquility, such as nurseries or reading nooks, while also injecting a touch of drama into living rooms or dining areas.
Tips for achieving this look:
– Utilize high-quality paint to ensure smooth transitions.
– Use a sponge or rag for blending, achieving that soft ombre effect.
– Practice on a sample board prior to painting your ceiling.
Ombre ceilings can be tailored to fit your personal style by adjusting the colors to complement existing decor, ensuring seamless integration into any room.
Step-by-step instructions:
1. Select your ombre colors and prepare the ceiling.
2. Apply the darker color on the edges first.
3. Gradually blend in the lighter shade using a sponge or brush, working in sections.
4. Ensure the transition is smooth and repeat as necessary until satisfied.
Fun fact: Ombre ceilings use a subtle color gradient to trick the eye into seeing more height. In spaces with painted ceiling ideas like an ombre from dark edges to light centers, ceilings feel up to 20% taller, creating a calm, expansive vibe—perfect for bedrooms and meditation spaces.
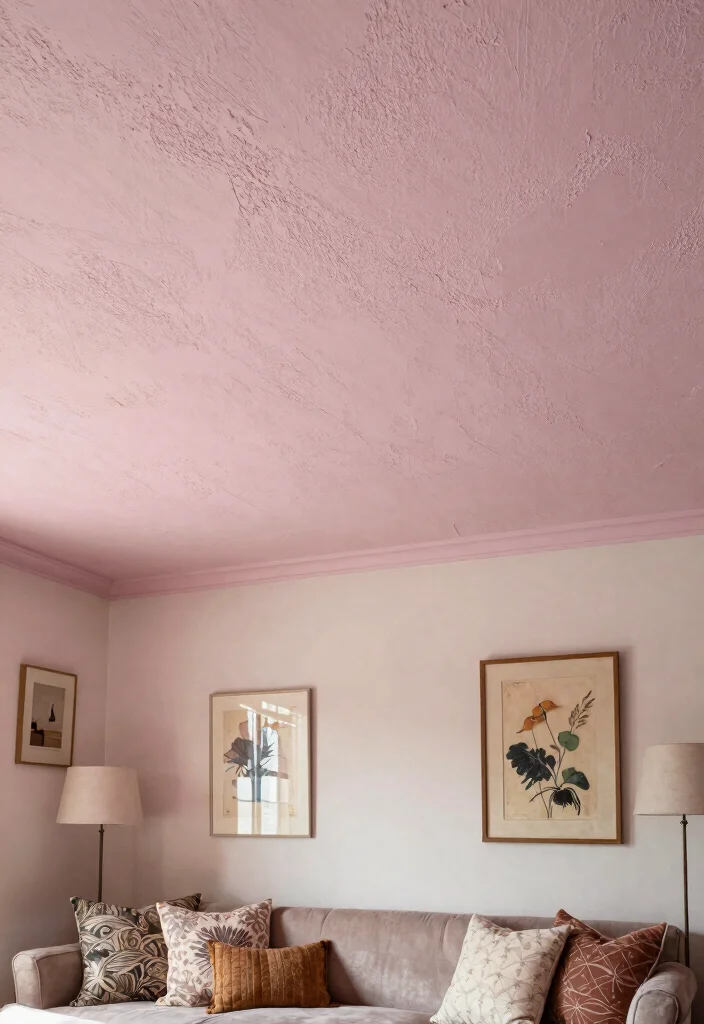
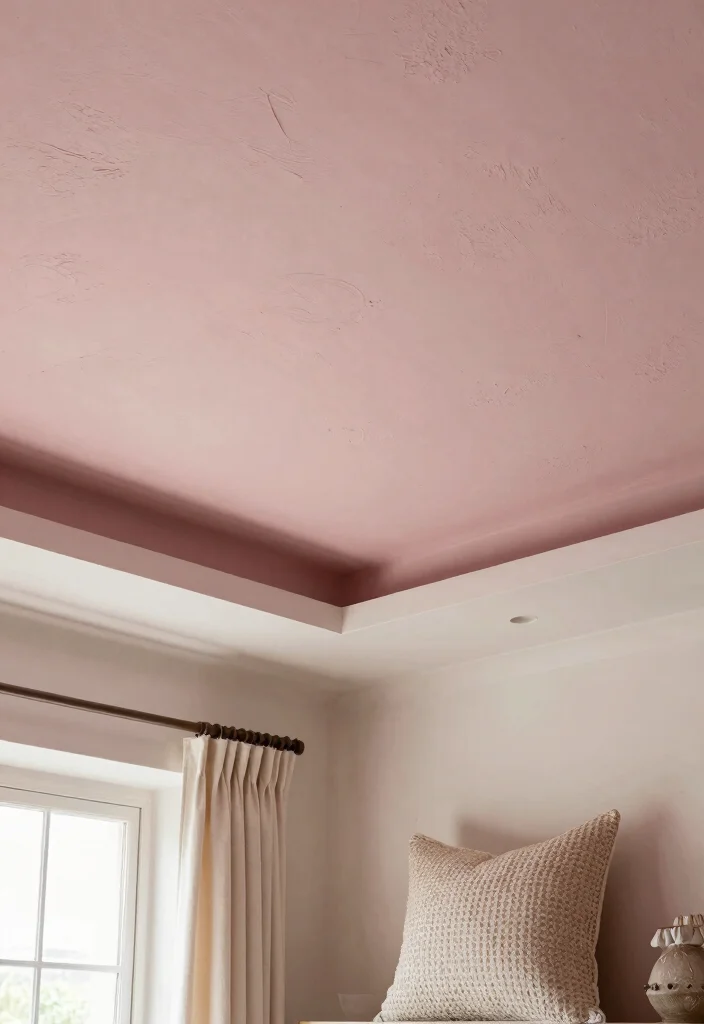
4. Striking Monochrome
If minimalism appeals to you, a striking monochrome ceiling can make a bold statement with effortless elegance. Dark colors like black or gray create a dramatic backdrop that contrasts beautifully with lighter walls and decor. Imagine a deep black ceiling paired with soft white walls and vibrant artwork; it’s chic, bold, and undeniably stylish.
This look is ideal for modern lofts or contemporary spaces, providing a sleek foundation that elevates your decor without overpowering it.
Tips for achieving this look:
– Opt for a high-gloss finish to add depth and reflectivity.
– Ensure adequate lighting to balance the darker tones.
– Complement the space with lighter furniture and accents.
This design works wonders in intimate spaces like dining or media rooms, creating an inviting atmosphere that feels cozy and warm.
Step-by-step instructions:
1. Choose a deep, rich paint color.
2. Prepare the ceiling surface, applying primer if needed.
3. Using a roller, paint the ceiling starting from the edges for even coverage.
4. Add a second coat if necessary for depth.
5. Artistic Murals
Unleash your creativity with an artistic mural gracing your ceiling! This trend allows you to showcase your personality and craft a unique statement. Whether depicting a sprawling landscape, abstract design, or playful scene, a mural can whisk you away every time you gaze upwards.
Perfect for playrooms, nurseries, or artist studios, this approach fills the room with fun and whimsy. Imagine a vibrant, swirling galaxy painted across your ceiling, inspiring dreams and creativity.
Tips for achieving this look:
– Sketch your design on paper before painting on the ceiling.
– Utilize vibrant colors to ensure the mural stands out.
– Consider hiring a professional muralist if you’re unsure of your skills.
Murals can be as grand or subtle as you desire, easily becoming the centerpiece of any room.
Step-by-step instructions:
1. Plan your mural design and color scheme.
2. Prepare the ceiling surface and lightly sketch your design.
3. Choose your paint and start applying based on your sketch, focusing on one area at a time.
4. Allow to dry completely before adding details or finishing touches.
6. Textured Ceilings
Infuse depth and intrigue into your space with textured ceilings. Techniques like sponging, rag rolling, or combing can create stunning effects that transform an ordinary ceiling into a captivating work of art. Imagine a textured ceiling painted in soft tones, where light and shadow play across raised surfaces, crafting a delicate interplay of colors.
Textured ceilings are perfect for adding character in living rooms, dining areas, or bedrooms, enhancing the ambiance with a cozy, inviting feel. They shine in eclectic or vintage-themed spaces.
Tips for achieving this look:
– Select techniques that match your skill level and desired outcome.
– Use high-quality paint for durability and vibrancy.
– Experiment with various colors to find what reflects your style.
Textured ceilings can also aid in sound absorption, creating a quieter atmosphere, particularly in larger areas.
Step-by-step instructions:
1. Choose your texture method and paint color.
2. Apply a base coat to the ceiling.
3. While the base coat is wet, apply your chosen texture technique for best results.
4. Allow to dry completely and enjoy your beautifully textured ceiling!
📹 Related Video: How To Add Texture To Walls and Ceilings | DIY Tips | Zillow
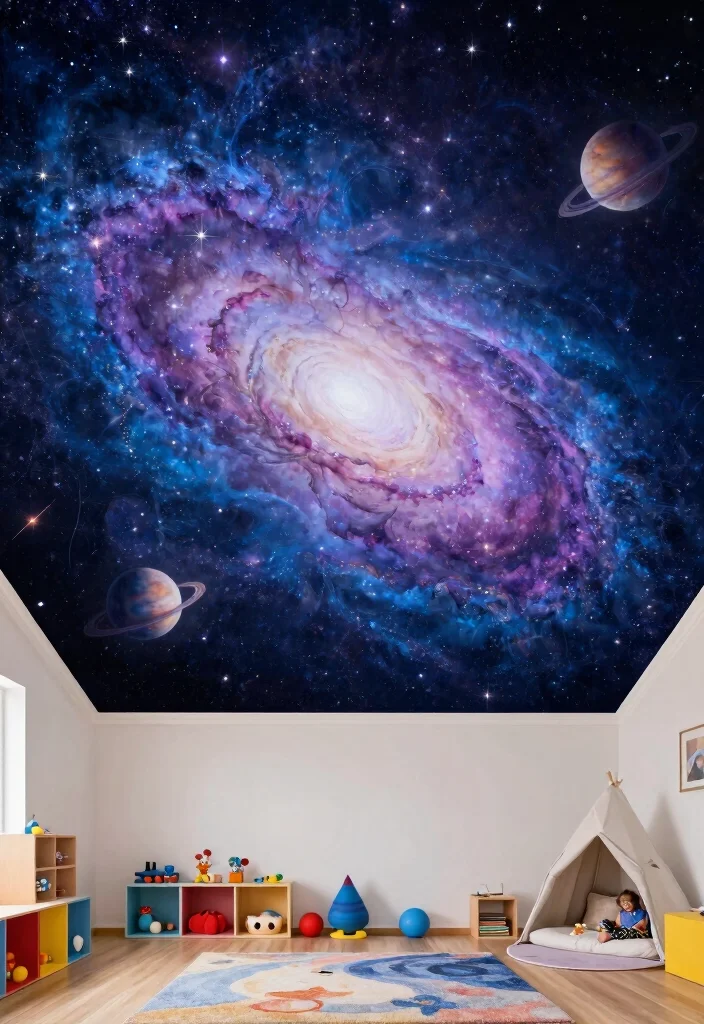
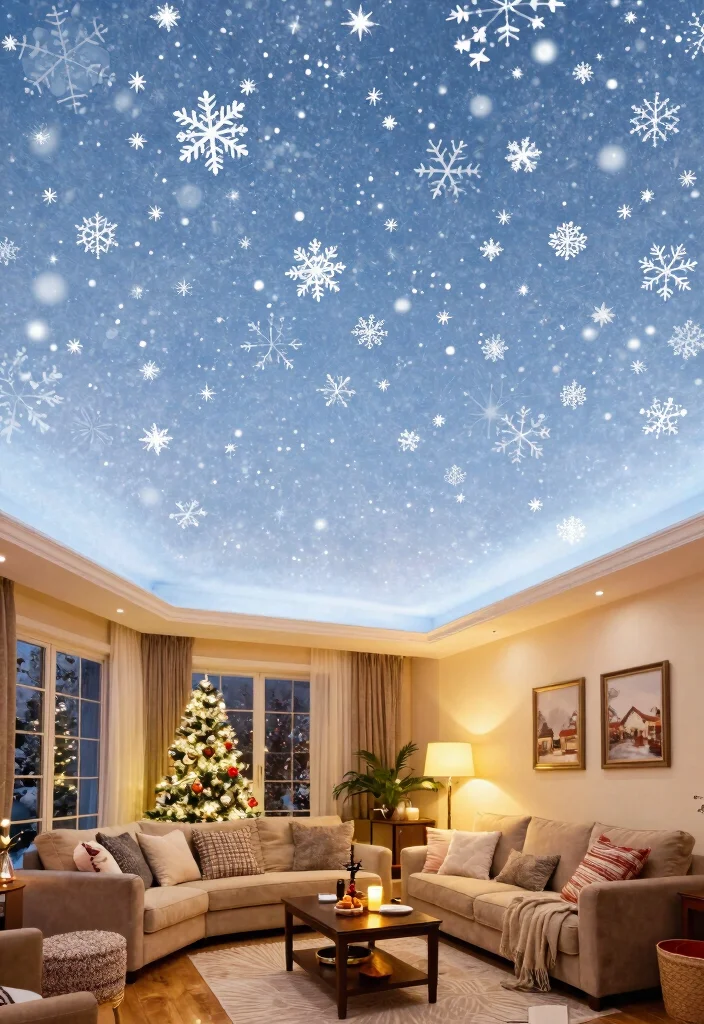
7. Celestial Themes

Transform your ceiling into a celestial spectacle with starry night themes or cosmic designs. Utilizing deep blues, blacks, and silvers can craft a breathtaking night sky that captivates dreamers and stargazers alike. A twinkling star pattern evokes a sense of calm, ideal for bedrooms or meditation spaces.
This style allows your ceiling to become a conversation piece, inviting admiration and intrigue from visitors. Picture a dark ceiling sprinkled with glowing stars and a crescent moon – it’s like having a piece of the universe inside your home!
Tips for achieving this look:
– Use glow-in-the-dark paint to enhance the celestial theme at night.
– Include constellations that hold personal significance.
– Use a stippling brush to create star effects for added depth.
This theme promotes relaxation and calmness, making it an excellent choice for bedrooms and tranquil spaces.
Step-by-step instructions:
1. Choose your color palette for the night sky.
2. Paint the entire ceiling in the darkest shade, letting it dry.
3. With a stippling brush, apply lighter colors to create stars and celestial bodies.
4. For added magic, incorporate glow-in-the-dark elements once the paint is dry.
8. Bright and Playful Colors
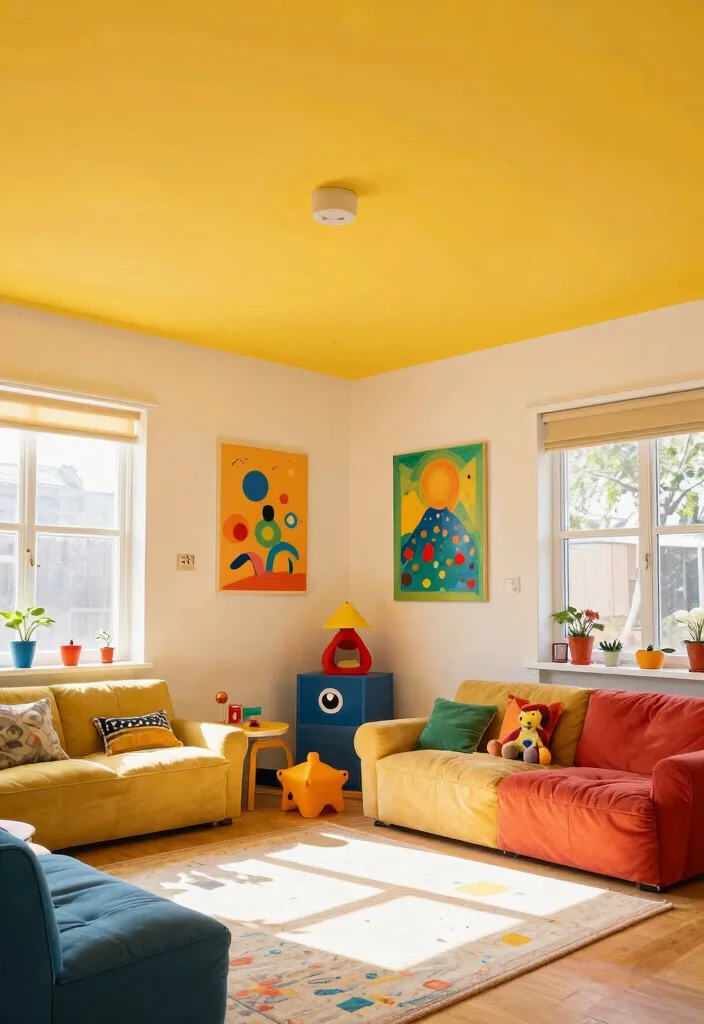
Inject a joyful burst of color into any room with bright and playful ceiling hues! Vibrant yellows, greens, and pinks can elevate your mood and bring a sense of fun to your home. Ideal for children’s rooms, play areas, or lively living spaces, these cheerful colors set the stage for creativity and energy.
Imagine a sunny yellow ceiling instantly brightening the room and putting a smile on your face every time you enter.
Tips for achieving this look:
– Select colors that coordinate with your decor while still being bold.
– Consider using multiple colors in playful patterns for added excitement.
– Ensure good lighting to maintain color vibrancy.
Bright colors can also create the illusion of larger, more open spaces, enhancing the overall feel of the room.
Step-by-step instructions:
1. Choose your vibrant color palette and prepare the ceiling.
2. Decide on a solid color or a multi-colored pattern.
3. Apply paint carefully, using a roller for large areas and a brush for edges.
4. Allow it to dry completely before adding any additional layers or details.
9. Rustic Wood Finishes
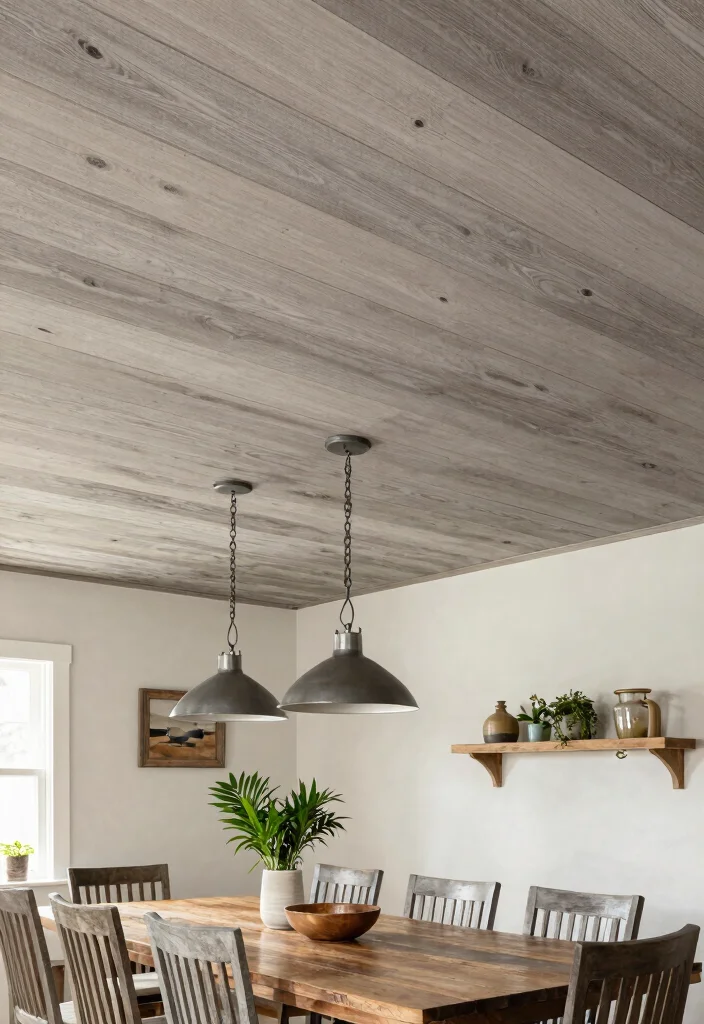
Invite the beauty of nature indoors with rustic wood finishes on your ceiling. This style adds warmth and texture, crafting a cozy atmosphere that feels inviting and relaxing. Imagine a painted wood ceiling in soft grays or whites, reminiscent of a charming cabin nestled in the woods.
Rustic finishes thrive in kitchens, dining areas, and living rooms, beautifully complementing farmhouse-style decor. The authenticity of wood tones creates a harmonious ambiance in your home.
Tips for achieving this look:
– Use faux wood panels if real wood isn’t an option.
– Opt for light-colored stains to keep the space feeling open and airy.
– Pair your wood ceiling with rustic lighting fixtures for a cohesive aesthetic.
This style is particularly effective in homes with high ceilings, adding dimension without overwhelming the space.
Step-by-step instructions:
1. Choose your wood finish color and materials.
2. Prepare the ceiling surface and install wood panels or paint.
3. Use a wood grain tool for added texture authenticity.
4. Add rustic decor elements to enhance the overall ambiance.
How To Choose Bold Painted Ceiling Ideas
When considering a painted ceiling, it’s important to choose a design that complements your home’s overall aesthetic. A well-thought-out ceiling can enhance the space and create a statement. Here are some helpful criteria to guide your selection process: 1. Consider Your Room’s SizeThe size of the room plays a crucial role in your ceiling choice. A large room can handle bold colors or intricate designs, while smaller spaces often benefit from lighter shades or simple patterns to avoid feeling cramped. If the room has high ceilings, you might opt for darker tones that bring the space down to a cozier level.
2. Match with Existing Decor
Take a close look at your current decor. Your ceiling paint should harmonize with wall colors, furniture, and overall style. If your decor leans toward vintage or eclectic, consider floral patterns or whimsical designs. For modern spaces, geometric shapes or monochrome choices might work best.
3. Think About Lighting
Lighting can drastically influence how a ceiling color appears. Natural light will brighten bold colors, while artificial light can change their tone. Test paint samples in different lighting conditions. If your room gets a lot of sunlight, consider how the colors will shift throughout the day.
4. Select a Paint Finish
The finish of your ceiling paint impacts both the look and feel of the space. Flat or matte finishes are great for hiding imperfections but can absorb light, making a room feel darker. On the other hand, satin or semi-gloss finishes reflect light and can energize a room but may emphasize flaws. Choose based on the ambiance you wish to create.
5. Explore Creative Treatments
Don’t shy away from unique ceiling treatments! Techniques like stenciling or ombre effects can bring a dynamic look without overwhelming the space. You could also layer textures for added depth. If you’re feeling adventurous, murals or celestial themes can transform a ceiling into a focal point.
6. Set a Budget
Finally, consider your budget. Some designs may require more time or specialty paints, which can increase costs. It’s wise to balance creativity with what you can afford. Look into DIY options if you’re handy, or consult a professional for more complex designs.
Pro Tip: Start with a mood board! Collect colors, patterns, and images that inspire you. This visual guide will help you stay focused on your vision and ensure all elements in the room work together harmoniously.
Choosing the right painted ceiling is about more than just color—it’s about creating an atmosphere that reflects your personality and enhances your home’s aesthetic. By considering size, matching decor, lighting, paint finish, creative treatments, and your budget, you’ll be on your way to crafting a ceiling that truly makes a statement!
10. Artistic Stencils
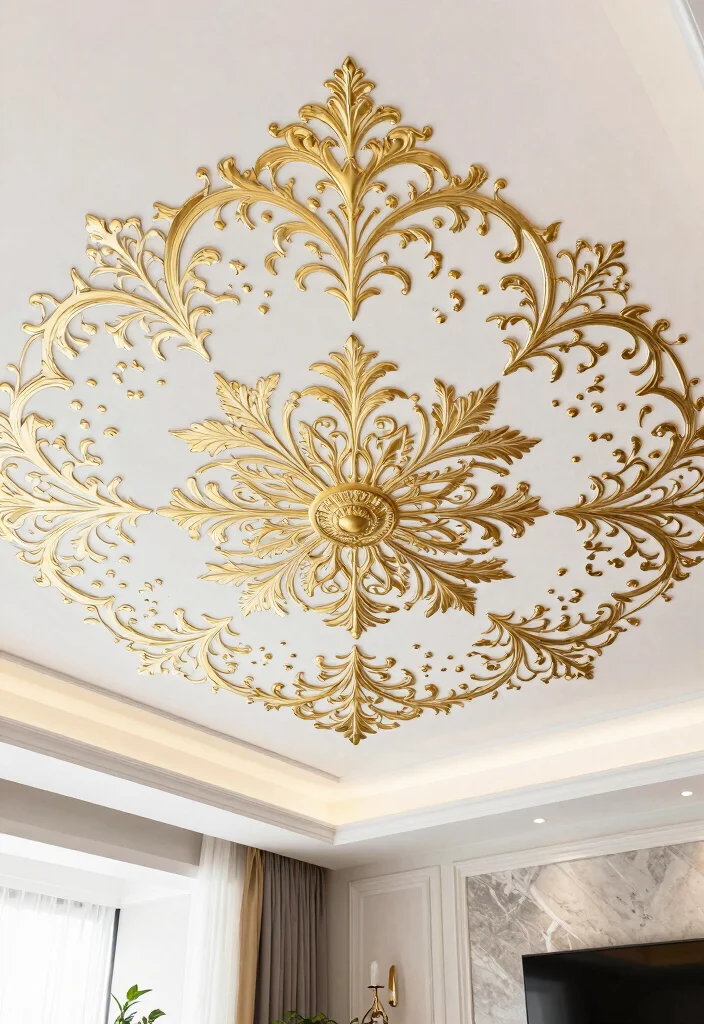
Elevate your ceiling with artistic stencils that add a layer of sophistication. This method allows for the creation of intricate designs and patterns, enhancing the room’s overall aesthetic. Think delicate vines, swirling motifs, or geometric shapes that frame a central feature.
Stenciling can be a fantastic DIY project, enabling you to customize your space while showcasing your creativity. Imagine a beautiful stencil pattern in metallic gold or silver on a soft white ceiling, radiating elegance and charm.
Tips for achieving this look:
– Choose high-quality stencils that can be reused.
– Apply paint using a sponge or stencil brush for precision.
– Practice on a sample board to perfect your technique.
Stenciling offers a budget-friendly way to achieve a high-end look without splurging on elaborate fixtures or wallpaper.
Step-by-step instructions:
1. Choose your stencil design and colors.
2. Prepare the ceiling and gather your materials.
3. Secure the stencil using painter’s tape.
4. Apply paint with a sponge or brush, ensuring even coverage, and repeat as needed.
11. Two-Tone Ceilings
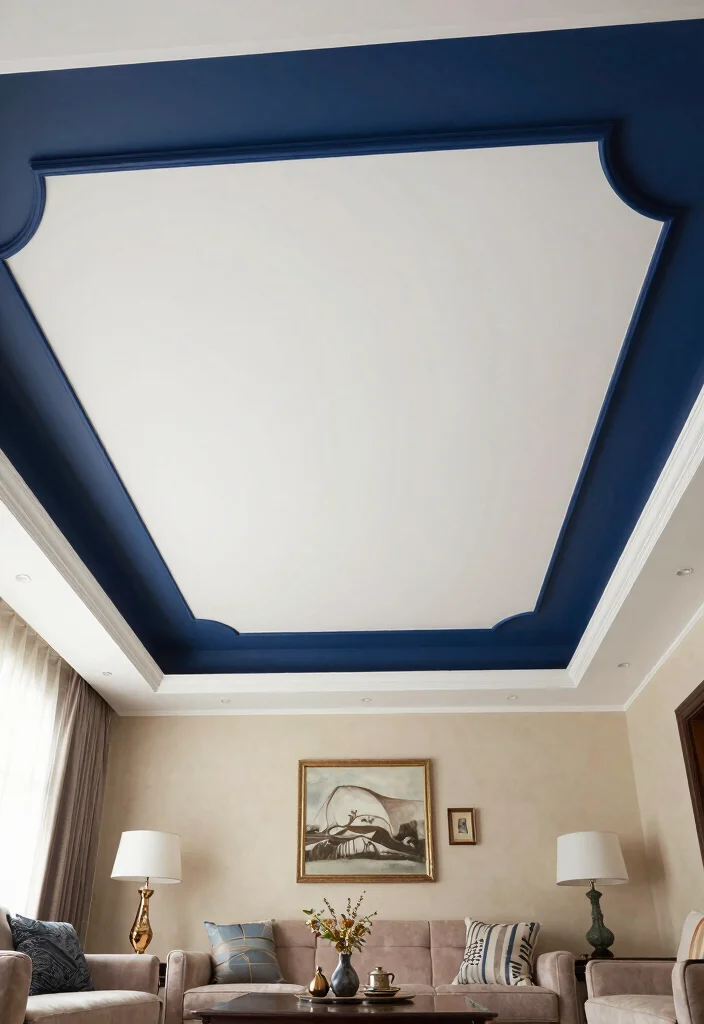
Add depth and interest to your interior with two-tone ceilings that can redefine the look of a room. This technique involves painting the edges of the ceiling in a darker hue while keeping the center lighter, creating a framing effect that draws the eye upward. It’s a straightforward yet impactful way to give your room a polished appearance.
Ideal for living rooms or dining areas, this style introduces a touch of elegance and sophistication while making the space feel more inviting.
Tips for achieving this look:
– Choose contrasting colors that harmonize with your decor.
– Use painter’s tape to achieve clean lines between the two colors.
– Ensure the lighter color isn’t too stark against the darker shade for a smooth transition.
This approach works particularly well in rooms with crown molding, accentuating architectural details and adding character to the space.
Step-by-step instructions:
1. Select your colors and prepare the ceiling surface.
2. Apply the darker color along the ceiling edges, using painter’s tape for clean lines.
3. Once the edges are dry, paint the center of the ceiling with the lighter color.
4. Carefully remove the painter’s tape to reveal a crisp finish.
12. Whimsical Patterns
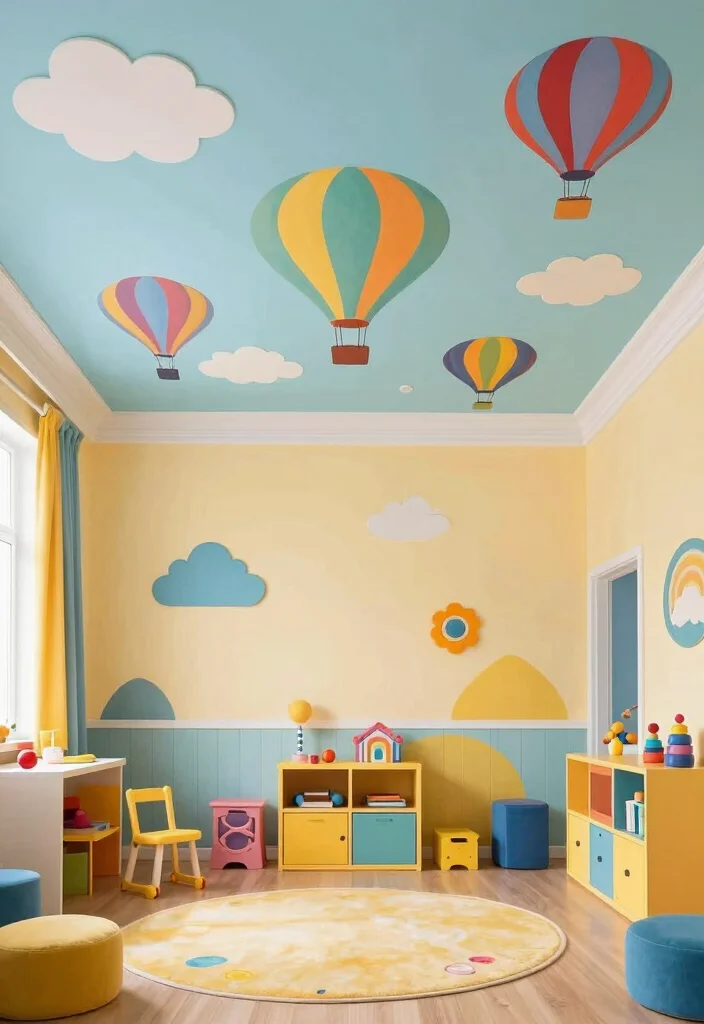
Whimsical patterns on the ceiling infuse fun and playfulness into any room. Think cheerful polka dots, vivid stripes, or lighthearted doodles that create a lively atmosphere. Perfect for children’s rooms or creative spaces, these designs ignite joy and spark imagination.
Picture a ceiling decorated with playful clouds and hot air balloons, encouraging daydreaming and creativity.
Tips for achieving this look:
– Maintain a consistent color palette for harmony.
– Mix and match patterns while keeping some elements cohesive.
– Consider removable wall decals for a temporary option.
Whimsical ceilings can be a fantastic way to reflect your child’s interests, making their space uniquely theirs while fostering their creativity.
Step-by-step instructions:
1. Plan your whimsical pattern and color scheme.
2. Prepare the ceiling and begin applying your base color.
3. Add your patterns using stencils or freehand, working in sections.
4. Allow to dry completely before adding any final touches.
13. Layered Textures
Layered textures on ceilings add an exceptional richness to your interior design. Combining various materials or paint techniques creates a stunning effect that engages the senses and elevates the ambiance of the room. Picture a mix of soft pastel paint with a raised stencil pattern, providing a tactile experience that draws you in.
This style is particularly effective in entryways or living rooms, where it can set the tone for the rest of the home.
Tips for achieving this look:
– Use a variety of textures, such as paint, wood, or fabric.
– Consider how light interacts with the textures, enhancing their appearance.
– Combine bold colors with softer tones for balance.
Layered textures create visual interest without overwhelming a space, perfect for showcasing unique architectural elements or design features.
Step-by-step instructions:
1. Decide on your textures and color palette.
2. Prepare the ceiling, applying the base texture first.
3. Layer additional textures, allowing each to dry before proceeding.
4. Incorporate embellishments or details to enhance the layered effect.
14. Festive Themes
Capture the spirit of the season with festive themes painted onto your ceiling! Whether it’s winter snowflakes, summer sunshine, or autumn leaves, seasonal ceiling art can create a playful and vibrant atmosphere in your home. Picture a ceiling adorned with delicate snowflakes during winter, turning your space into a cozy wonderland.
This trend is especially delightful for celebrations or holiday-themed rooms, spreading joy and excitement for every occasion.
Tips for achieving this look:
– Use temporary paint or removable decals for easy changes.
– Incorporate colors that complement your seasonal decor.
– Think about layering different designs for more depth.
Seasonal ceilings can become a cherished part of holiday traditions, bringing family and friends together in celebration.
Step-by-step instructions:
1. Choose your seasonal theme and color palette.
2. Prepare the ceiling and outline your designs.
3. Paint carefully, using stencils for intricate details.
4. Allow to dry and decorate the room with complementary accents.
Fun fact: Seasonal painted ceiling ideas can boost a room’s mood by up to 40%, and they often take only a weekend to install. Paint winter snowflakes, summer sunbursts, or autumn leaves to create a playful, festive atmosphere for every celebration.
15. Chic Metallics
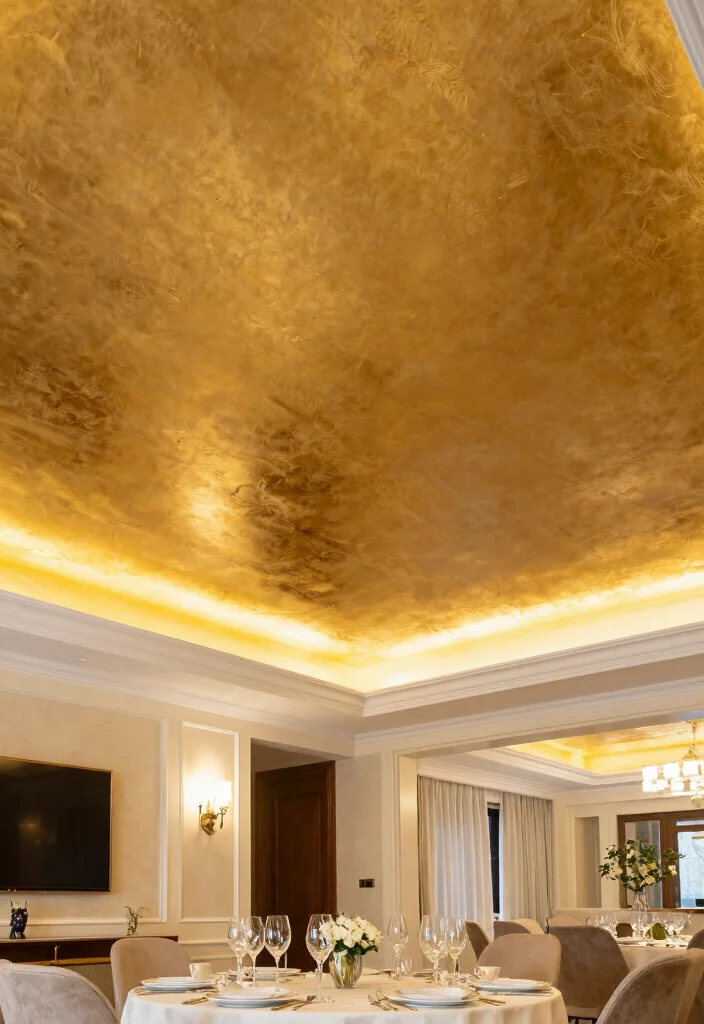
Elevate your decor with chic metallic ceilings that inject glamour and sophistication. Metallic paints in gold, silver, or copper create stunning reflections, beautifully catching the light as it dances across the surface. Imagine a warm gold ceiling that glows softly, pairing perfectly with rich furnishings for a luxurious feel.
This dazzling treatment works wonders in dining rooms, entryways, or any space where you want to leave a lasting impression.
Tips for achieving this look:
– Opt for high-quality metallic paints for optimal coverage and shine.
– Pair metallic ceilings with understated decor to avoid overwhelming the space.
– Test samples on the ceiling to see how the light interacts with the metallic finish.
Metallic ceilings can create an inviting sense of warmth while maintaining elegance, making any room feel cozy and inviting.
Step-by-step instructions:
1. Select your desired metallic shade and prepare the ceiling.
2. Apply a base coat if necessary to enhance the metallic finish.
3. Carefully paint the ceiling, using a roller or brush for even coverage.
4. Let it dry and consider adding a clear finish for protection.
16. Bold Abstract Designs
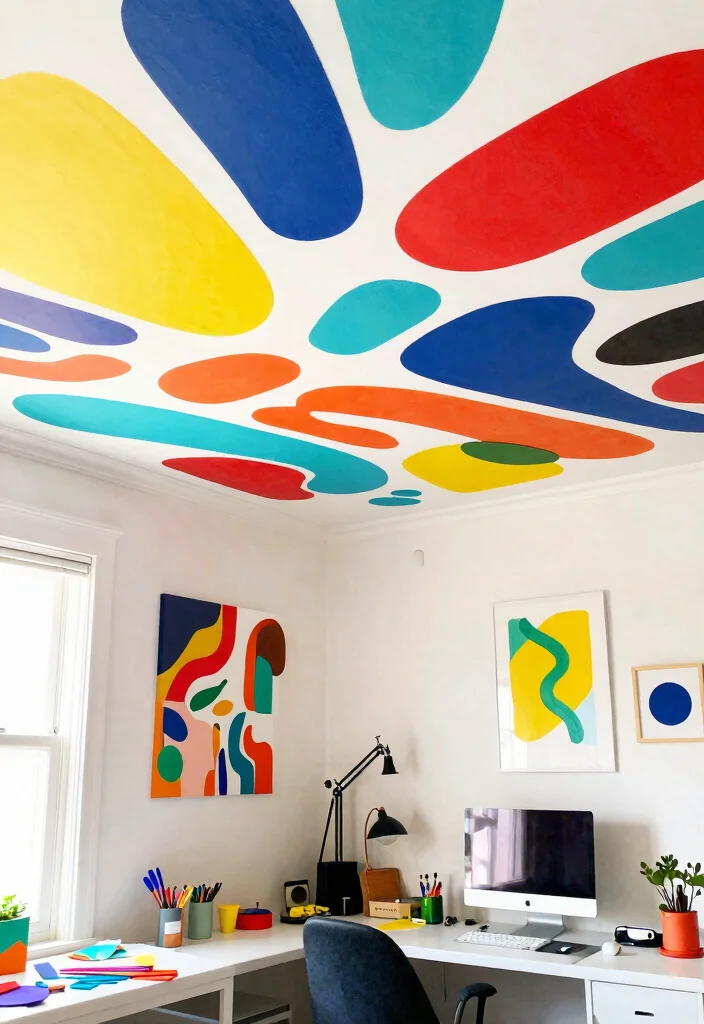
Let your creativity flow with bold abstract designs that turn your ceiling into a captivating artwork. Utilize vibrant colors and dynamic shapes to create a stunning focal point that reflects your personal style. Imagine a vibrant abstract mural bursting with splashes of color and energetic lines, inspiring creativity.
This style is perfect for creative spaces, playrooms, or anywhere you wish to infuse energy and inspiration.
Tips for achieving this look:
– Experiment with various colors and shapes that resonate with you.
– Consider using a large canvas technique to simplify painting.
– Don’t hesitate to incorporate contrasting colors for a more striking appearance.
Abstract ceilings can stimulate creative thinking, perfect for setting an energetic tone in a room that enhances focus and imagination.
Step-by-step instructions:
1. Plan your abstract design and colors.
2. Prepare the ceiling, applying a base color if needed.
3. Utilize large brushes and sponges to apply your colors and shapes, layering as desired.
4. Allow to dry completely before adding additional details or layers.
17. Nature-Inspired Designs
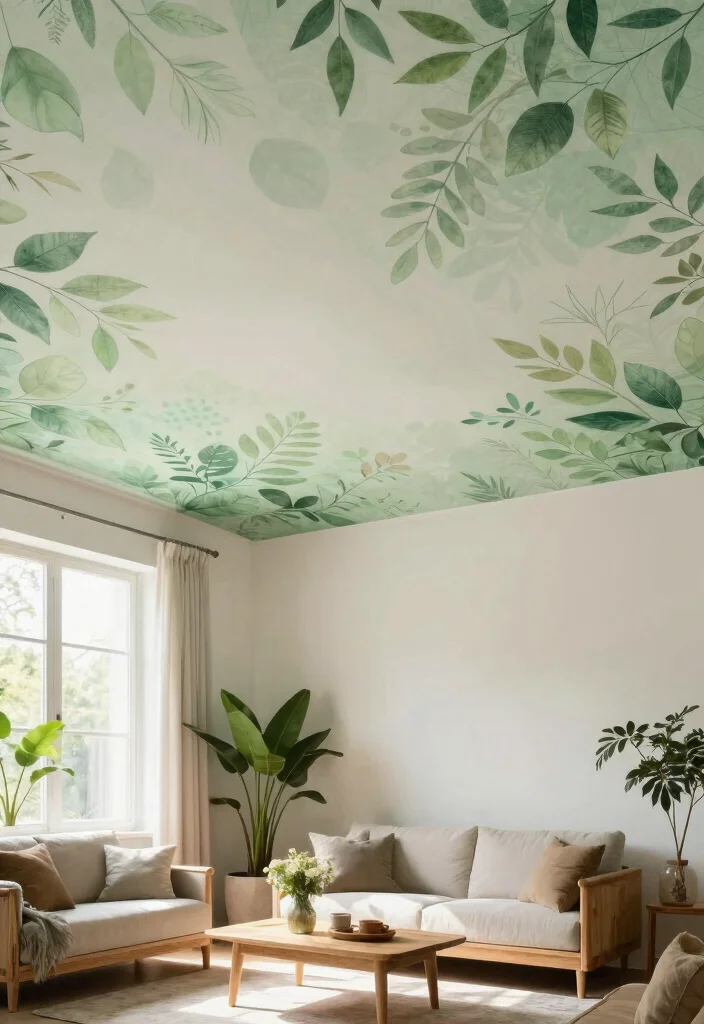
Bring the beauty of the outdoors inside with nature-inspired ceiling designs. From leafy patterns to serene landscapes, these ideas create a calming atmosphere reminiscent of lush gardens and scenic vistas. Picture a soft green ceiling dotted with delicate leaves, forming a tranquil oasis in your home.
Nature-inspired ceilings shine in living rooms, bedrooms, or sunrooms, adding a refreshing touch that encourages relaxation and harmony.
Tips for achieving this look:
– Use earthy tones that reflect the natural world.
– Incorporate realistic elements, like branches or flowers, into your design.
– Pair the ceiling with natural materials like wood and stone for a unified look.
Nature-focused designs not only beautify a space but also promote well-being, fostering a sense of peace and mindfulness.
Step-by-step instructions:
1. Decide on your nature theme and colors.
2. Prepare the ceiling and lightly sketch your design.
3. Use natural imagery as inspiration, painting your designs in layers for depth.
4. Finish with a protective layer to ensure durability.
18. Minimalist White Ceilings with Bold Accents
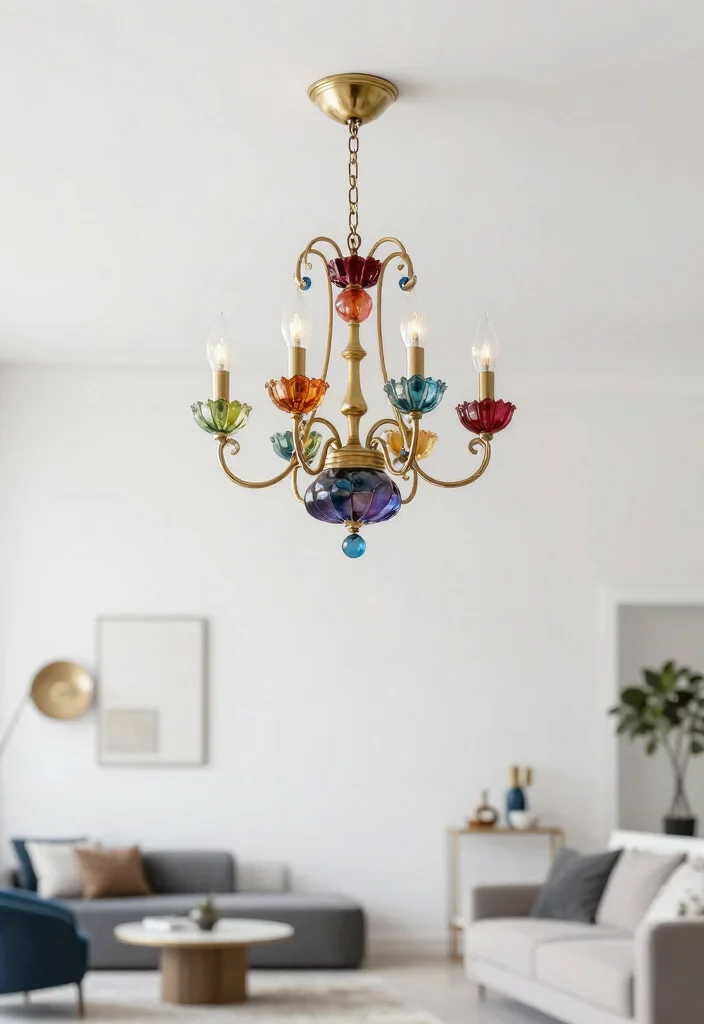
For a sleek and modern aesthetic, consider minimalist white ceilings paired with bold accent colors. A crisp white ceiling creates an airy and open feel, while vibrant accents can be introduced through light fixtures, furniture, or wall decor. This style strikes a perfect balance between simplicity and chic statement pieces.
Picture a bright white ceiling with a bold, colorful chandelier as the centerpiece, drawing the eye without overwhelming the space.
Tips for achieving this look:
– Keep the ceiling color clean and crisp for a polished appearance.
– Choose statement pieces that are vibrant and eye-catching.
– Ensure that the accents harmonize with your overall decor.
This approach works particularly well in smaller spaces, creating an illusion of depth while allowing for personal expression through accent decor.
Step-by-step instructions:
1. Paint the ceiling in a bright white and let it dry completely.
2. Select your bold accent color for decor or fixtures.
3. Integrate the accents throughout the room for a cohesive look.
4. Enjoy the balance of simplicity and vibrant style in your space.
Conclusion
Painting your ceiling not only adds visual interest but also tells a story about your style and personality. Whether you choose whimsical patterns, bold colors, or vintage-inspired designs, each idea offers a unique way to elevate your home decor. Don’t shy away from experimenting with these painted ceiling ideas; they can transform your space and create a delightful atmosphere that reflects who you are. Let’s start planning that next inspiring project!
Frequently Asked Questions
What are some bold ceiling designs that really make a statement with painted ceilings?
Painted ceiling ideas can be the hero of a room. Try bold geometric patterns (chevrons or diamonds), or a hand-painted mural with vintage motifs. For a dramatic impact, use bold ceiling designs in a bright room and keep walls neutral to balance the look. You can also add texture with creative ceiling treatments like metallic glaze, stenciling, or faux tin panels to introduce texture. If you are new to this, start small with a single accent area and test swatches before scaling up. With the right approach, a statement ceiling can define your eclectic vintage space without overpowering it.
How can I use ceiling paint inspiration to create a dramatic ceiling color without overwhelming the room?
Ceiling paint inspiration should start with the room’s light and scale. Pick a color that complements wall tones and natural light; test large swatches near the ceiling, not on a tiny card. Consider a mid-to-dark tone only if the room has good daylight, and keep the walls lighter to balance. Choose a semi-gloss or satin for durability and easy cleaning, or matte if you want a softer look. Use dramatic ceiling colors sparingly—perhaps just above a focal area like a dining nook or reading alcove. Finish with white or pale trim to frame the ceiling and avoid a busy look. With painted ceiling ideas, you can achieve high impact without sacrificing warmth.
What are creative ceiling treatments I can try in an eclectic vintage home?
Eclectic vintage loves texture and personality. Try stenciled patterns, gold or copper metallic glaze on a dark base, or a hand-painted mural with retro motifs. Install a faux tin tile look or wood beam painting to suggest architectural depth. Wallpaper the ceiling for a surprising twist, or add beadboard with a painted border for a vintage farmhouse vibe. For a softer touch, use a colorwash technique to create depth without solid blocks of color. Start small with a coffee area or reading nook ceiling to gauge how it feels with creative ceiling treatments before expanding to larger spaces. Remember to prepare the surface well and use appropriate primers and sealants so the finish lasts.
Which dramatic ceiling colors pair best with vintage decor and unique interior ceilings?
Deep blues, emerald greens, charcoal, or burgundy ceilings can look amazing against antique furniture and ornate light fixtures. A dark ceiling works best in rooms with plenty of natural light or white walls and trim to keep things balanced. If you are unsure, try a rich lapis or navy on the ceiling and add lighter wall colors and warm wood tones to anchor the space. Consider accenting with metallics or antique brass in fixtures to tie the look together. With dramatic ceiling colors and unique interior ceilings, you can craft a space that feels curated and playful.
What are common mistakes to avoid when painting ceilings and how can I ensure a flawless finish?
Common pitfalls include skipping prep, failing to protect floors and furniture, and not priming old surfaces. Tape edges carefully or use a steady hand to avoid drips. Start with a quality ceiling paint and primer tailored for ceilings, and pick a finish that suits your space (matte for less glare, eggshell or satin for easier cleaning). Use a roller with a snug nap and work in light, even coats to avoid lap marks. Take proper drying time between coats, and ventilate well. If you are aiming for a dramatic look, test color in a small area first and observe at different times of day. With thoughtful preparation, your ceiling paint inspiration can become a flawless, enduring feature in your eclectic vintage room.